5
Windows Genuine Advantage (WGA)

CARA MENGHILANGKAN TANDA/LOGO WGA

Windows Genuine Advantage (WGA) merupakan suatu sistem anti-pembajakan oleh Microsoft yang menyatakan keaslian produk Microsoft Windows dalam jaringan bagi beberapa sistem operasi Microsoft. Windows Genuine Advantage akan menghalangi pengunduhan dari Microsoft Download Center jika sistem operasi tersebut keasliannya tidak dapat diketahui. WGA melindungi Windows 2000, Windows XP, Windows Vista dan Windows 7, kecuali Windows Server 2003 atau keluarga Windows 9x.


1. Buka Task Manager dengan Ctrl+Alt+Del
2. Matikan proses yang bernama “wgatray.exe”
3. Restart/reboot komputer dan masuklah ke dalam safe mode
4. Pada safe mode, buka registry editor ato regedit melalui menu Run. Ketik regedit kemudian enter
5. Pada regedit, carilah HKEY_LOCAL_MACHINE\SOFTWARE\microsoft\windowsNT\CurrentVersion\Winlogon\Notify, kemudian hapus folder/directory “WGALOGON”
6. Restart kembali komputer seperti biasa.

Selesai...

0
Amazon Shop

2
Cara dapat Kartu Debit Gratis Pioneer


FriendFinder adalah situs pertemanan dimana Anda bisa berkomunikasi dg membernya dari seluruh dunia. Hanya dengan daftar di FriendFinder, Anda bisa mendapatkan kartu debit gratis keluaran dari Bank Royal Scotland. Kartu tersebut sangat berguna untuk verified paypal, pengambilan uang dari penghasilan Anda di FriendFinder atau afiliasi yg lainnya di seluruh ATM didunia yg ada logo mastercardnya. Anda tidak perlu khawatir! Kartu debit tsb legal, aman dan terpercaya dan yg paling penting GRATIS. Nah bagaimana cara memperoleh kartu tsb dan memperoleh penghasilan dari FriendFinder ? Bacalah baik-baik dan ikuti langkah-langkahnya.

Ya… Anda bisa benar-benar kartu debit payoneer dengan cuma-cuma alias gratis dengan mengikuti cara langkah -langkah berikut ini:
1. Kunjungi: http://adultfriendfinder.com/go/g1266932
2. Tekan tombol: Join Now
3. Isilah data-data Anda dg lengkap.


I am a : Man jika Anda laki-laki, Woman jika Anda perempuan
Interested in meeteng a : Man jika ingin mencari/berteman dg laki-laki, woman dg perempuan, atau bisa Anda pilih dua-duanya.
For : Friendship (berteman), Dating (ketemuan), Serious relationship (hubungan serius), Marriage (menikah), bisa Anda pilih lebih dari satu, pilih semuanya juga bisa.
Birthdate : Tanggal lahir Anda
Country : Negara Anda
Zip/Postal code : Kosongkan saja kalau Anda berada selain Amerika (US only)
Email Address : Isikan email Anda
Username : username Anda antara 4 sampai 16 karakter
4. Lalu klik Click Here and Have Fun
5. Setelah itu Anda masuk ketahap berikutnya.

City : Kota tempat tinggal Anda
Closest City: Sama seperti diatas
State: Propinsi Anda
Your Height : Tinggi Anda
Your Body Type : Tipe badan Anda
Your Race : Ras Anda atau suku Anda biasanya kalau Indonesia adalah Asia
Marital Status : Status pernikahan Anda
Your Religion : Agama Anda
Your Education : Pendidikan terakhir Anda
Your Occupation : Pekerjaan Anda misal Staff jika Anda pegawai, Business jika Anda pengusaha dll.
Introduction Title : Judul tentang diri Anda, bisa Anda buat I am a good Man atau I like Travelling dll minimumnya 10 karakter
Tell others about yourself : Ceritakanlah tentang diri Anda, sebaiknya dalam bahasa inggris, misalnya I am a good women, I like travelling and my hobby reading, computer, sports, and others, i love new friend men or women, buatlah suka-suka Anda, minimumnya 50 karakter.Jika Anda sudah memiliki foto uploadlah foto Anda, klik browse lalu carilah file yg berisi foto Anda. Jika Anda belum punya fota bisa Anda kosongkan dulu, nanti dikemudian hari bisa Anda isi kembali.
6. Setelah itu klik Click to Join FriendFinder. Bukalah email Anda cari e-mail yang berasal dari FriendFinder, lalu klik Activate Now Maka Anda sudah diaktivasi, jika Anda ingin login isilah dg username dan password yg ada di email Anda. Setelah itu keluarlah dulu klik log off.
7. Lalu klik http://adultfriendfinder.com/go/g1266932
8. Klik Affiliates
9. Lalu klik Affiliate Signup.
10. Isilah data-data tsb dg benar.


Preferred Program: Pilihlah no 1
First Name: Nama pertama Anda
Last Name: Nama akhir Anda
URL: Website/blog Anda, wajib Anda isi, jika Anda belum punya buat saja http://ujie-caprone.blogspot.com, tapi ini hanya untuk sementara nanti bisa Anda ganti.
Desired Password: Password yg Anda inginkan
Preferred Newsletter Language: English
Email Address: Masukkan email Anda
Secondary Email Address: Email Anda yg lain, boleh juga dikosongkan
Checks Payable To: Nama lengkap Anda sesuai KTP
Street Address: Alamat Anda sesuai KTP
City: Kota tempat tinggal Anda
State/Province: Provinsi tempat Anda tinggal
Country: Negara Anda
ZIP/Postal Code: Kode Pos Anda
What is your business tax classification? Kosongkan saja karena untuk warga Amerika
Tax ID or Social Security Number: Kosongkan saja karena untuk warga Amerika
Phone Number: No telp Anda buatlah dg format misalnya no telp Anda 021 1234567 maka buat 6221 1234567 atau no hp Anda 081xxxxx maka buat 6281xxxxx.
Which Instant Messenger do you use? Pilih saja None
Use ePassporte : Pilih saja No
Please give us your comments: Buatlah komen Anda misalnya Thank You, Heloo
11. Setelah itu klik Click Here for the Last Step Lalu klik kotak kecil yg ada tulisan Yes, I have read and accepted the Affiliate Agreement, bla bla …. Lalu klik Submit.
12. Setelah itu klik Account InformationLalu klik here yg warna biru di tulisan “Here is your account information“. Click here to update your information. klik Payoneer: Signup to be paid by Prepaid MasterCard®.You will be directed to a FriendFinder page hosted by Payoneer, where you can sign up for a card.

Lalu isilah data-data Anda di Payoneer tsb, setelah Anda Isi tunggulah kira-kira 30 hari kartu Anda sampai di rumah Anda, setelah kartu debit Anda sampai lalu aktivasilah ikuti petunjuk yg ada disurat yg dikirim bersama dg kartu Anda.

Nah gampangkan …. Hanya dg menjadi member FrindFinder Anda bisa dapat kartu debit dari payoneer kalau Anda langsung daftar di payoneer Anda tidak bisa mendapatkannya karena country untuk Indonesia tidak ada. Lihatlah kembali email Anda, nah disana Anda akan diberikan username dan password untuk affiliate. Login sebagai member dg login sebagai affiliate itu beda.

Selamat mencoba! Asalkan anda mengisi alamat dengan lengkap dan benar, kartu debit payoneer pasti akan sampai kerumah anda!

Semoga bermanfaat.

0
Install Joomla Menggunakan XAMPP di Ubuntu

XAMPP merupakan sebuah program web server yang sudah sangat lengkap karena dalam sekali instal kita bisa mendapatkan sebuah Apache Server, MySQL Database, dan tentu saja PHP. Dengan adanya XAMPP kita tidak perlu lagi repot-repot menginstal komponen tersebut satu-persatu. Karena menurut pengalaman teman saya jika ingin menginstal satu-persatu maka akan sangat menyulitkan saat mengkonfigurasi komponen-komponen tersebut. Baiklah, berikut ini akan saya jelaskan tutorialnya secara mendetail :

Langkah 1
Download XAMPP dan Joomla.
Download file yang diperlukan terlebih dahulu yakni XAMPP dan Joomla. Pastikan Anda mendownload versi stabil yang terbaru.

Langkah 2
Menginstal XAMPP.
Setelah selesai mendownload file yang diperlukan, sekarang kita instal XAMPP terlebih dahulu. Pastikan file hasil download tadi satu folder dengan direktori kerja Anda.

1. Misalkan Anda simpan file tadi di Desktop, maka jalankan perintah berikut di terminal. (login terlebih dahulu sebagai root) :
# cd Desktop
2. Ekstrak XAMPP ke direktori /opt :
# tar xvfz xampp-linux-1.7.2.tar.gz -C /opt
3. Kemudian jalankan XAMPP dengan perintah berikut :
# /opt/lampp/lampp start
4. Test apakah XAMPP sudah dapat bekerja.

Buka browser Mozilla Firefox Anda, dan ketikkan : http://localhost
5. Untuk menghentikan XAMPP gunakan perintah berikut :
# /opt/lampp/lampp stop

Langkah 3
Mengesktrak Joomla.

1. Buat direktori Joomla terlebih dahulu di /opt/lampp/htdocs :
# mkdir /opt/lampp/htdocs/joomla
2. Ektrak Joomla ke di rektori /opt/lampp/htdocs/joomla :
# unzip Joomla_1.5.15-Stable-Full_Package.zip -d /opt/lampp/htdocs/joomla
3. Untuk mempermudah proses penginstalan Joomla, maka disarankan untuk mengganti setting permission folder /opt/lampp dengan cara memasukkan perintah berikut :
# chmod -R 775 /opt/lampp
4. Untuk menghindari pesan kesalahan saat instalasi Joomla, Anda juga harus memodifikasi file ‘php.ini’ di direktori /opt/lampp/etc.
# gedit /opt/lampp/etc/php.ini
Kemudian tekan Ctrl+F dan cari kata ‘display_errors = on‘ ganti dengan ‘display_errors = Off‘.

Langkah 4
Menginstal Joomla.

1. Sekarang saatnya instalasi Joomla di komputer Anda. Buka browser Mozilla Firefox Anda, kemudian ketikkan :
http://localhost/joomla/
2. Pilih bahasa kemudian klik Next.
3. Kemudian Joomla mengecek semua komponen yang dibutuhkan sudah tersedia atau belum (Pre-Installation Check). Lalu klik Next.
4. Klik Next lagi saat Joomla menampilkan Lisensi di layar.
5. Pada tahap Database Configuration, masukkan beberapa informasi berikut :
Database Type: mysql (default)
Host Name: localhost (default)
User Name: root (default)
Password:(dikosongkan saja)
Database Name: joomla (nama database)

6. Pada tahap FTP Configuration klik Next saja jika Anda tidak menggunakan FTP Server.
7. Pada tahap Main Configuration, masukkan beberapa informasi berikut :
Put your Site Name : ‘BolangUNIX’ (masukkan nama situs yang diinginkan).
Enter Your Email : ‘afriandi_xxx@yahoo.com’ (masukkan alamat email Anda).
Enter Admin Password : ******* (buat password admin Anda).
Confirm Admin Password : *******
Kemudian jangan lupa menginstal Default Sample Data dengan mengklik button ‘Install Sample Data‘.
Klik Next.
8. Di layar diberitahukan bahwa Joomla tidak dapat memodifikasi file ‘configuration.php‘ sehingga kita harus memodifikasinya sendiri.
Copy semua kode di dalam box, kemudian masukkan perintah berikut di terminal :
# gedit /opt/lampp/htdocs/joomla/configuration.php
Lalu paste-kan semua kode tadi di file tersebut, lalu klik Save.
9. Di layar diberitahukan lagi bahwa kita harus menghapus folder installation yang terdapat di di
rektori /opt/lampp/htdocs/joomla, gunakan perintah berikut :
# rm -rf /opt/lampp/htdocs/joomla/installation/
10. Kembali ke layar instalasi Joomla, kemudian klik link ‘Click here when the directory has been removed‘. Anda telah berhasil menginstal Joomla.

Langkah 5
Menggunakan Joomla.

Sekarang kita sudah bisa mulai membuat website menggunakan Joomla. Buka Mozilla Firefox Anda lalu ketikkan:
‘http://localhost/joomla/administrator/‘.
Kemudian masukkan username dan password Anda, lalu klik login.


Sekian, mari membuat website menggunakan Joomla

1
Sharing Internet Connection in Ubuntu

Setting up a computer to share its internet connection should be easy.After all, you’ve successfully networked your computers together and even shared files with all your home computers, so why not the Internet? Well if you have a small home network of computers all connected and have tried to open up a browser, you’ve probably found out that things aren’t quite as straight forward as connecting one machine with an Ethernet cable to the computer that has the DSL/cable modem.

The secret is that everything comes down to having a gateway


A gateway is a computer or device than can route data between different networks. Put it this way, if your computers are on one network and every other computer connected to the Internet is on a different one, to pass information across network boundaries you need a device which is connected to both networks and equipped to decide whether information from one network should go out to the other network, and vice versa.

So, without a gateway there is no way for the other computers in your network to receive or pass information to the other networks, and consequently, they have no Internet access.

The computer in your small network which is directly connected to the cable or DSL modem is provided with a default gateway by the Internet service provider. That allows the computer to connect to the interenet, but unfortunately for us that gateway is not part of your home network - rather it is a separate network formed between the computer connected to the cable/DSL modem and the ISP itself.

In order to enable Internet access on the rest of your small home network, the computer or device that connects with your ISP must become a gateway for the computers in your local home network. Once this has been configured, it will enable all of the other home network computers to access the Internet by sending and receiving information through that gateway.

The easiest way of acquiring a gateway for your home network is to buy a cable/DSL router. Given how cheap they currently are (about a quarter of the price they commanded when they first appeared in the marketplace), there really isn’t much of an excuse not to buy one.

The major advantages of having a hardware router doing your internet sharing include minimal configuration, since they are set up to act as a gateway by default (it’s pretty much all they do), increased reliability (they are not a PC… PCs crash.), and security, since most of these devices incorporate a firewall. Highly recommended!

You’ll also need

a working dial-up Internet account with an Internet Service Provider (ISP) or

a working broadband (cable, DSL, satellite, etc.) Internet connection.

Share your Internet connection using the following Procedure

Note: Type all the following commands in a root terminal

Start by configuring the network card that interfaces to the other computers on you network

# ifconfig ethX ip

where ethX is the network card and ip is your desired server ip address (Usually 192.168.0.1 is used)

Then configure the NAT as follows

# iptables -t nat -A POSTROUTING -o ethX -j MASQUERADE

where ethX is the network card that the Internet is coming from

# echo 1 > /proc/sys/net/ipv4/ip_forward

Install dnsmasq and ipmasq using the following command

# apt-get install dnsmasq ipmasq

Restart dnsmasq using the following command

# /etc/init.d/dnsmasq restart

Reconfigure ipmasq to start after networking has been started

# dpkg-reconfigure ipmasq

Start by configuring the network card that interfaces to the other computers on you network

# ifconfig ethX ip

where ethX is the network card and ip is your desired server ip address (Usually 192.168.0.1 is used)

Then configure the NAT as follows

# iptables -t nat -A POSTROUTING -o ethX -j MASQUERADE

where ethX is the network card that the Internet is coming from

# echo 1 > /proc/sys/net/ipv4/ip_forward

Add the line “net.ipv4.ip_forward = 1″ to /etc/sysctl.conf

# gedit /etc/sysctl.conf

Reboot your system is optional.

2
Installing Ubuntu Linux on a usb pendrive

This tutorial will show how-to install Ubuntu on a usb stick. Even though this tutorial uses Ubuntu as its base distribution, you could virtually use any type of Linux liveCD distribution.

Being able to run Linux out of a usb bar is a great way to enjoy the live CD experience (being able to use Linux on any computer you might get by) and the big advantage of being easier to carry around than a CD.

1. Requirements

In order to reproduce this tutorial, you will need a few items such as:

* a ubuntu liveCD
* a usb bar of at least 1G
* a running Linux operating system


Now that you have all this, it is time to prepare you USB bar do host the Ubuntu liveCD files.
2. Setting up the USB disk
2.1. Finding the device

In the first place, you need to plug your usb drive and check under which device it is associated. To find out the device, run:

$ sudo fdisk -l


On my system, the device appears as being /dev/sdb, I will therefore use /dev/sdb as a reference for this tutorial, please replace it accordingly to your system (might be sda, sdc ...).
Once you found your device, you are going to create the partitions.

Using the wrong device name might destroy your system partition, please double check
2.2. Making the partitions

Make sure every of your already mounted partition are unmounted:

$sudo umount /dev/sdb1


and then launch fdisk, a tool to edit partition under linux:

sudo fdisk /dev/sdb


We are going delete all the partition and then create 2 new partition: one fat partition of 750M which will host the files from the live CD iso, and the rest on another partition.

At fdisk prompt type d x where x is the partition number (you can simply type d if you only have one partition), then:

* n to create a new partition
* p to make it primary
* 1 so it is the first primary partition
* Accept the default or type 1 to start from the first cylinder
* +750M to make it 750 Meg big
* a to toggle the partition active for boot
* 1 to choose the 1 partition
* t to change the partition type
* 6 to set it to FAT16


Now we have out first partition set up, let's create the second one:

* n to create yet again a new partition
* p to make it primary
* 2 to be the second partition
* Accept the default by typing Enter
* Accept the default to make your partition as big as possible
* Finally, type w to write the change to your usb pendrive


Partitions are now created, let's format them.
2.3. Formatting the partitions

The first partition is going to be formated as a FAT filesystem of size 16 and we are going to attribute it the label "liveusb".

$ sudo mkfs.vfat -F 16 -n liveusb /dev/sdb1


The second partition is going to be of type ext2 with a blocksize of 4096 bytes and the label casper-rw. Mind that it has to be labeled as casper-rw otherwise the tutorial won't work!.

$ sudo mkfs.ext2 -b 4096 -L casper-rw /dev/sdb2


At this stage, our usb pendrive is ready to host the liveCD image. Now, let's copy the files to the usb bar.

3. Installing Ubuntu on the USB stick
3.1. Mounting Ubuntu liveCd image

In the first place we need to mount our ubuntu iso. Depending if you have the .iso file or the CD, there is 2 different ways of mounting it.
3.1.1. Mounting from the CD

People using Ubuntu or any other user-friendly distro, might just have to insert the cd and it will be mounted automatically. If this is not the case:

$ sudo mount /media/cdrom


should mount it.

3.1.2. Mounting from an .iso image file

We will need to create a temporary directory, let say /tmp/ubuntu-livecd and then mount our iso (I will be using a feisty fawn iso).

$ mkdir /tmp/ubuntu-livecd
$ sudo mount -o loop /path/to/feisty-desktop-i386.iso /tmp/ubuntu-livecd


Once the cd image is ready, it is time to mount the newly created usb bar partitions:
3.2. Mounting the usb bar partitions

Same here, you might be able to get both your partition by simply replugging the usb pendrive, partition might appears as: /media/liveusb and /media/casper-rw. If this is not the case, then you will need to mount them manually:

$ mkdir /tmp/liveusb
$ sudo mount /dev/sdb1 /tmp/liveusb


All the partitions we need are now mounted, let's copy the files.
3.3. Copying the files to the usb bar

Let positionned yourself on the CD image directory (in my case: /tmp/ubuntu-livecd , but it might be /media/cdrom , and copy at the root of your usb first partition:

* the directories: 'casper', 'disctree', 'dists', 'install', 'pics', 'pool', 'preseed', '.disk'
* The content of directory 'isolinux'
* and files 'md5sum.txt', 'README.diskdefines', 'ubuntu.ico'
* as well as files: 'casper/vmlinuz', 'casper/initrd.gz' and 'install/mt86plus'

$ cd /tmp/ubuntu-livecd
$ sudo cp -rf casper disctree dists install pics pool preseed .disk isolinux/* md5sum.txt README.diskdefines ubuntu.ico casper/vmlinuz casper/initrd.gz install/mt86plus /tmp/liveusb/


It might complain about symbolic links not being able to create, you can ignore this.

Now let's go to the first partition of your usb disk and rename isolinux.cfg to syslinux.cfg:

$ cd /tmp/liveusb
$ sudo mv isolinux.cfg syslinux.cfg


change /tmp/liveusb according to your settings

Edit syslinux.cfg so it looks like:

DEFAULT persistent
GFXBOOT bootlogo
GFXBOOT-BACKGROUND 0xB6875A
APPEND file=preseed/ubuntu.seed boot=casper initrd=initrd.gz ramdisk_size=1048576 root=/dev/ram rw quiet splash --
LABEL persistent
menu label ^Start Ubuntu in persistent mode
kernel vmlinuz
append file=preseed/ubuntu.seed boot=casper persistent initrd=initrd.gz ramdisk_size=1048576 root=/dev/ram rw quiet splash --
LABEL live
menu label ^Start or install Ubuntu
kernel vmlinuz
append file=preseed/ubuntu.seed boot=casper initrd=initrd.gz ramdisk_size=1048576 root=/dev/ram rw quiet splash --
LABEL xforcevesa
menu label Start Ubuntu in safe ^graphics mode
kernel vmlinuz
append file=preseed/ubuntu.seed boot=casper xforcevesa initrd=initrd.gz ramdisk_size=1048576 root=/dev/ram rw quiet splash --
LABEL check
menu label ^Check CD for defects
kernel vmlinuz
append boot=casper integrity-check initrd=initrd.gz ramdisk_size=1048576 root=/dev/ram rw quiet splash --
LABEL memtest
menu label ^Memory test
kernel mt86plus
append -
LABEL hd
menu label ^Boot from first hard disk
localboot 0x80
append -
DISPLAY isolinux.txt
TIMEOUT 300
PROMPT 1
F1 f1.txt
F2 f2.txt
F3 f3.txt
F4 f4.txt
F5 f5.txt
F6 f6.txt
F7 f7.txt
F8 f8.txt
F9 f9.txt
F0 f10.txt


Woof, finally we have our usb disk almost usuable. We have a last thing to do: make the usb bootable.
3.4. Making the usb bar bootable.

in order to make our usb disk bootable, we need to install syslinux and mtools:

$ sudo apt-get install syslinux mtools


And finally unmount /dev/sdb1 and make it bootable:

$ cd
$ sudo umount /tmp/liveusb
$ sudo syslinux -f /dev/sdb1


Here we are :D , reboot, set your BIOS to boot from the usb bar and enjoy Ubuntu linux from a pendrive
4. Troubleshooting

If you are having trouble booting on the usb bar, this might be due to your MBR being corrupted. In order to fix it up, you can use lilo (I installed lilo on my box only for thid purpose).

$ lilo -M /dev/sdb


will fix the MBR on device /dev/sdb

3
Super Fast Internet for Ubuntu

Local DNS Cache for Faster Browsing

A DNS server resolves domain names into IP addresses. So when you request “google.com” for example, the DNS server finds out the address for the domain, and sends your request the right way.

You can run a DNS cache on your computer. This will speed up the process of looking up domain names when browsing. The difference is about 30-60 ms for me. Multiply that difference by the number of websites you visit a day for an approximate estimate of the speed improvement. Of course, all this would be worth it if it weren’t for the fact that setting this up is way too easy.

The following instructions are for someone with a cable (broadband) internet connection, where the computer gets it’s local IP address using DHCP from the router in your house/office:

The package we will be using for caching nameserver lookups is called dnsmasq. So first, install it using:
$sudo apt-get install dnsmasq

(If you can’t find then, then you probably haven’t added the Universe repository to your list of repositories.)

No uncomment the following line (that is edit the line to NOT have a “#” in the beginning) in the file
/etc/dnsmasq.conf

listen-address=127.0.0.1


Now edit
/etc/dhcp3/dhclient.conf

and make sure the section below exactly like this, especially the line that says “prepend domain-name-servers 127.0.0.1;”

#supersede domain-name "fugue.com home.vix.com";
prepend domain-name-servers 127.0.0.1;
request subnet-mask, broadcast-address, time-offset, routers,
domain-name, domain-name-servers, host-name,
netbios-name-servers, netbios-scope;


Explanation for the above change: In the normal case, when you get a new dhcp lease, the dhcp3 client (tool) on your computer gets a new lease, and updates the
/etc/resolv.conf

file on your computer with the right values for the DNS servers to use (usually some machine in the network of your hosting provider). Adding the “prepend” option as we did above ensures that “127.0.0.1″ will appear on the top of the list of DNS servers. That magic number refers to your own computer. So in the future, whenever your computer needs to resolve a domain name, it will forward that request to dnsmasq (which is running at 127.0.0.1 – your computer). If the details for the domain name are already in you cache, well and good, dnsmasq will serve it up and make the process real fast. If it is not in the cache, then dnsmasq will look at the
/etc/resolv.conf

file and use the nameservers listed below the “127.0.0.1″. I hope that explains things.

Now open the file /etc/resolv.conf in your text editor. It probably looks like:

search yourisp.com
nameserver 217.54.170.023
nameserver 217.54.170.024
nameserver 217.54.170.026


The 127.0.0.1 is missing right now since you haven’t renewed your lease after you edited the /etc/dhcp3/dhclient.conf file. So, let us add that in manually this one time. After you do, your /etc/resolv.conf file will look like the following:

search yourisp.com
nameserver 127.0.0.1
nameserver 217.54.170.023
nameserver 217.54.170.024
nameserver 217.54.170.026


Don’t worry if the numbers are different – if they are not, then hey – we must be neighbours ;)

Okay. We are almost done here. All we have to do now is to restart dnsmasq so that the changes we made to the configuration file take effect. You can do that using the command:
$sudo /etc/init.d/dnsmasq restart
.

Now you are running a local DNS cache. If you want to measure your speed improvement, type the command:
$dig google.com

You will see something like “;; Query time: 38 msec” there.
Now type the command again, and you should see something like:”;; Query time: 2 msec”

See, the first time, since google.com’s details were not in your cache (you are using it for the first time), the query took 38 ms. The second time, the cache speeds up the lookup. I have been using this for over a month now, and haven’t had a problem.

The following is ONLY for dsl customers
Note: If you have a dsl connection, the following may work:
Basically, the differences are in how the “conf” files are edited and used.
Copy the /etc/resolv.conf file to /etc/resolv.dnsmasq.conf
Then, edit the /etc/dnsmasq.conf file as follows:

# Change this line if you want dns to get its upstream servers from
# somewhere other that /etc/resolv.conf
resolv-file=/etc/resolv.dnsmasq.conf

You also have to uncomment the line that says
listen-address=127.0.0.1

Now, edit /etc/resolv.conf to have ONLY the following line in it:
nameserver 127.0.0.1

Next, edit /etc/ppp/peers/dsl-provider and change the line:
usepeerdns to
#usepeerdns

(that is, comment out that line)
The ppp client does not allow you to prepend the 127.0.0.1 entry to your
/etc/resolv.conf file
.
So what we did in the above was to create a copy of your previous resolv.conf for dnsmasq to use for lookups, update the file to use a local cache, and then prevent the ppp client from overwriting the resolv.conf file the next time. Now you can restart the dnsmasq service as I explained above, and start enjoying faster name resolution.
I don’t have a dsl connection, and so all the above is to the best of my knowledge.

0
Speed up Internet & Google Earth

This isn't anything new or my idea, I found it while searching through some of the old ubuntuforums posts.

It worked for me, it may work for you too.

Basically you disable ipV6 which apparently conflicts with ipV4, I'm no expert on the whys or hows but like I said, it worked for me.

1. Open your Gnome Terminal/ KDE Konsole and type :-
For Gnome
Quote:
gksudo gedit /etc/modprobe.d/aliases


or For KDE
Quote:
kdesu kate /etc/modprobe.d/aliases


2. Kate or Gedit will open and show you this file :-
(scroll down to see what to copy and paste)

Quote:
# These are the standard aliases for devices and kernel drivers.
# This file does not need to be modified.

# Please file a bug against module-init-tools if a package needs a entry
# in this file.

# network protocols ################### ########
alias net-pf-1 unix
alias net-pf-2 ipv4
alias net-pf-3 ax25
alias net-pf-4 ipx
alias net-pf-5 appletalk
alias net-pf-6 netrom
alias net-pf-7 bridge
alias net-pf-8 atm
alias net-pf-9 x25
# 1, 2, 3 new lines
alias net-pf-10 ipv6 off --
alias net-pf-10 off -- add these three lines here.
alias ipv6 off --
#alias net-pf-10 ipv6 =========comment (put #) the original line
alias net-pf-11 rose
alias net-pf-12 decnet
# 13 NETBEUI
alias net-pf-15 af_key
alias net-pf-16 af_netlink
alias net-pf-17 af_packet


3. Now "Save" and "Reboot"

There's another way too: instead of changing aliases file, create fie named bad_list in /etc/modprobe.d containing this line:

Quote:
alias net-pf-10 off

This method will work even if /etc/modprobe.d/aliases get replaced at some update.

Like I said these are NOT my ideas, I did them and now Google Earth and Firefox are noticeably faster for me.

1
Set-up a Ubuntu webcam security system

Have you ever wanted to spy see on what is going on in your home while you are away? Motion is a piece of open source software that acts as a motion detector. It enables you to set-up a webcam server that you can have all your cameras connected too, so you can view them remotely and also upload them to a remote server. Motion should run on most linux distributions but for this exercise I’m using the desktop version of Ubuntu linux.

Requirements

* Extra computer that we’ll use as the server.
* Distro of linux installed on the server. (Recommended, Ubuntu)
* USB webcam with a linux driver
* Static IP set for the server
* General knowledge of Linux like OS’s.
* A bit of free time

Step One

Okay lets start off by downloading the linux driver for your webcam. This great man wrote a single driver that is compatible with 244 different webcams! You can download it here onto the desktop of your server. If this does network for your camera please search Google for the right driver for yours.

Step Two

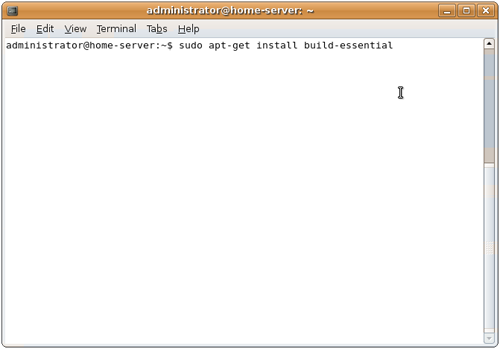
Once you’ve downloaded the driver we can start compiling it, but first make sure you have the package build-essential installed you can do so by typing in sudo apt-get install build-essential into the terminal, information on this package can be located here.

Build-essential


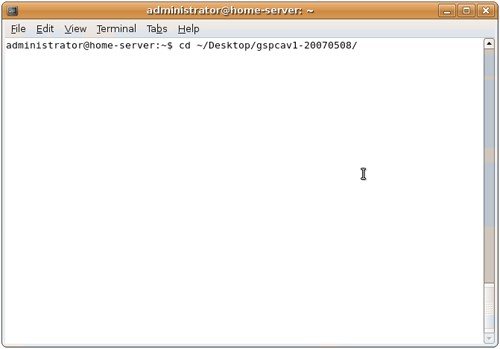
We are ready to start compiling the source code for the driver. Once we extract the .tar.gz file by right-clicking on it, then select Extract Here. This should take a few seconds to complete, then open up terminal again and type in cd ~/Desktop/gspcav1-20070508/ push enter on your keyboard and then type ./configure push enter this should take a minute or two (don’t worry if this does not work just precede to compiling). After that start compiling it by typing in make. After it’s been compiled you can install it by typing in sudo make install this will install the package and you should have a webcam that is recognized by linux now!

cd unix

Step Three

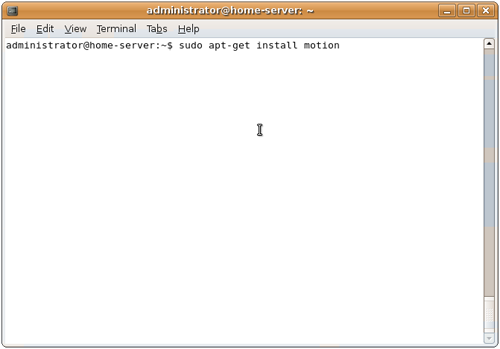
Installing , the software your are going to use to monitor your webcam for motion. Type in sudo apt-get install motion into terminal, then press enter.

sudo apt-get install motion

Step Four

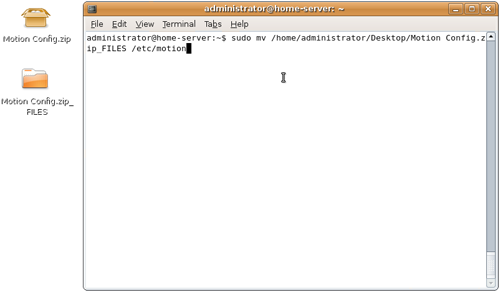
It’s now time to setup Motion’s configuration files. You can download my config files that I’ve already filled in; here (read through the entire motion.conf file and change the settings to fit your needs). Put the files in the Motion Config.zip file in your /etc/motion/ folder on your server by first extracting the files onto the desktop, then typing sudo mv ~/Desktop/Motion Config.zip_FILES /etc/motion/ into the terminal.

sudo mv motion config

Please note this if you only have more than a single webcam you will need one more thread.conf for each extra cam (example; thread0.conf, thread1.conf, thread2.conf) You will also need to add the links to these files at end of the motion.conf file.

Step Five (optional)

Install wput a command line FTP client that you can use to upload the photos, to an remote FTP server, that have been taken by Motion. Install this by typing sudo apt-get install wput into the terminal. You can configure Motion to use wput to upload photos that have been taken by adding

# Command to be executed when a picture (.ppm|.jpg) is saved (default: none)# The filename of the picture is appended as an argument for the command.on_picture_save wput ftp://USERNAME:PASSWORD@REMOTE SERVER %f

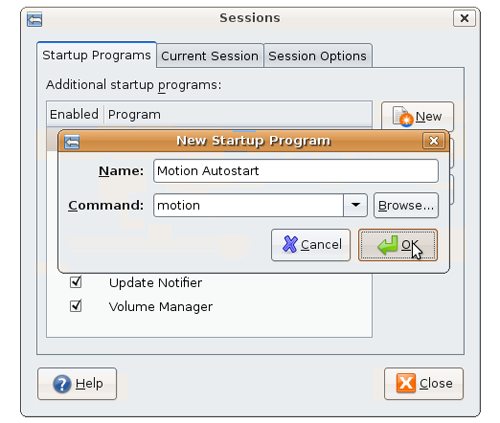
to you motion.conf file (if your using the motion.conf I provided this is already in there, just replace the server info in the ftp:// section)Step SixTo add Motion to startup automatically start with the server, just open “System” from the menu bar on the top of the screen, then “Preferences,” then “Sessions.” Create a new startup program type in a name for it and then type motion in the command section. Click“OK.” Then restart the server.

Motion Autostart

Step Seven

You should now be able to open a web interface for Motion now by typing in localhost:8000 from the server itself or XXX.XXX.X.XXX:8000 from another computers web browser. To view a live stream of your webcam type localhost:8001 from the server itself or XXX.XXX.X.XXX:8001 from another computers web browser. You can change settings from this interface here too, you can even make Motion generate it’s own config files to fit your setup exactly!

Conclusion

Enjoy the web interface for viewing you webcam as-well as you new home-brew security system! All thanks to , , , and all the other great open source developers. Keep up the great work! If you need more information about getting Motion running visit; here. There is also a ton of configuration options. From taking movies instead of photos, to launching a script when motion is detected; here.

Edit: You can have as many webcams hooked up to the server as it can handle, USB 1 inputs will only handle one camera per. USB 2 inputs will allow many more than that. For more information on setting up multiple cameras with Motion visit; here and also read step 4 again.

1
How to Access Your Ubuntu Remotely

When I was using Windows XP I would use UltraVNC to access my desktop remotely, then when I “upgraded” to Vista I did not take to the time to do that, instead I used the built in Remote Desktop feature. Now that I have truly upgraded to Ubuntu, I want to be able to access my machine remotely. This blog post describes two methods.

First things first. You must make sure you can access your computer through the Internet. If you don’t have a static IP address, this means you must subscribe to a service that can dynamically map your IP to a domain address. I use no-ip.com now and I have used dyndns.com.

Next, you will need to make sure your router and firewall will allow traffic into the ports you will open for remote access.

Finally, you must install the SSH server on your computer. I just typed in “sudo apt-get install openssh-server” and I was good to go.

Following are the two methods I suggest:

1. Command Line SSH
1. This is nice because I can ssh into the computer via any computer with Putty, and even with my Pocket PC.
2. After downloading Putty
1. Type in the Host Name and choose ssh
2. Under Connection->SSH->X11 check Enable X11 forwarding.
3. Under that next to X display location you will type in [your ip or domain]:[display number]
1. Find the display number by typing env into a bash prompt and look at the DISPLAY variable.
4. Save your configuration by typing in a “Saved Session” name and clicking the save button under the Session Category.
5. Double click the saved session and then you are ready to login.
2. X through SSH
1. Download and install Xming.
2. Go to Program Files->Xming->XLaunch
3. Choose how you want your display to work.
4. For “Display Number”
1. Find the display number by typing env into a bash prompt and look at the DISPLAY variable.
5. Click Next
6. Choose “start a program” and click next
7. Choose “Using Putty”, fill out the configuration information (leave the password blank) and click next until you get to the final screen
8. I suggest you save your configuration
9. Now open up Putty

VNC is another option and it can be secured over SSH. Here is a tutorial for that.

5
How to make OpenOffice run faster in Ubuntu

Here we will discuss the procedure to be followed for making OpenOffice run faster in Ubuntu.

Some simple steps make OpenOffice snappier.

* Go to Applications > Office > OpenOffice.org Word Processor


  • The OpenOffice.org Word Processor is launched. Go to the Tools menu and select Options.
  • The Options window is opened.
  • Highlight Memory on the left panel, change the setting as shown below.


    • Reduce the number of Undo steps to a figure lower than 100. Adelstein suggests 20 or 30 steps.

    • Under Graphics cache, set Use for OpenOffice.org to 128 MB (up from the original 6MB).


    • Set Memory per object to 20MB (up from the default .5MB).

    • Set the number of objects under Cache for inserted objects at 20.

    • Check OpenOffice.org Quickstarter.

  • Now highlight Java on the left panel, uncheck Use a Java runtime environment


  • Click the OK button and close OpenOffice.org. Start it up again to experience the change in speed!


    Source: Zolved

2
How to Dual Monitors

Few weeks ago I became owner of new 22 inch monitor Samsung SyncMaster 225BW. I has plan to sell my old 19 inch HP1905, but today i decide to try dual monitor setup on my desktop PC. I’ve spent about 3 hours to get everything work and now I’m fully confident that two monitors are better than one.

There is a lot of guides and a few ways how-to configure multi monitor systems under Linux. Most of time i have try follow guides to get my system working, but reading documentation is always better ;-). Below you can find some tips about dual monitor setup. This post is not complete HOWTO, but maybe you can find some answers.


There is few ways to configure multi monitor systems and i have choose twinview, because that option is native feature of Nvidia drivers.Next you need comment out option Virtual under SubSection Display. That option respond for size of virtual desktop. Also you need add option “Viewport 0 0″ under same SubSection.

Both monitors connected to one video card GeForce 6600GT. SyncMaster connected with DVI and HP with VGA. System is Ubuntu 7.04 Beta, but all options will be valid on mostly all other systems.

First, as usual before any changes, you need backup current xorg.conf. Next open config in favourite editor, and add following lines under section Device:

Option "TwinView" "1"
Option "TwinViewXineramaInfoOrder" "DFP, CRT"
Option "UseDisplayDevice" "DFP, CRT"
Option "TwinViewOrientation" "DFP LeftOf CRT"
Option "NoPowerConnectorCheck"
Option "UseEdidFreqs" "1"
Option "Metamodes" "CRT-0: 1280x1024, DFP-0: 1680x1050"
Option "SecondMonitorHorizSync" "31-82"
Option "SecondMonitorVertRefresh" "56-76"

Here you can find complete description of used options. A lot of time spent to find how-to change order of displays (by default VGA display inits first). If that is OK for you, remove option TwinViewXineramaInfoOrder from config.


And a last change is under Section ServerLayout. Add following params:


Screen 0 "Default Screen" 0 0

Option "Xinerama" "Off"


Thats all. Save modified config, press Ctrl+Alt+Backspace to restart X server and enjoy your new desktop ;-) Feel free to ask any questions about configuration above. I will try to help you.


Here you can download my working xorg.conf


TwinView


Source : Zulu

0
Setup Your Computer to be a Router

If you have two network cards or some other means of connecting to the internet and a network card in your ubuntu computer, it can be a very powerfull router. You can set up basic NAT, do port forwarding, set up a proxy, and even do packet prioritization so your downloads dont interfere with gaming! This howto will cover setting up Webmin which will be used to configure masquerading, DHCP, and DNS servers. It also lets you configure port forwarding. QoS (packet prioritization) will be covered in a later guide. This guide is made using kubuntu to show that it will work with any version of ubuntu.

Webmin
Webmin is a web based computer management tool. It is similar to the web interface that you get from routers you buy at stores, but allows you to control most of the computer.
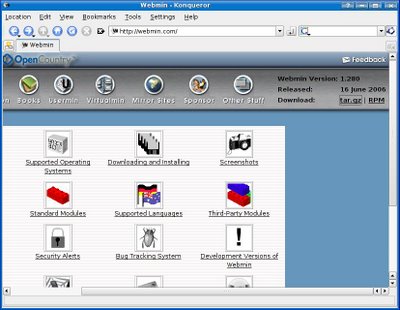
To install webmin, you must first go to its website at www.webmin.com and download the latest version in the top right. Download the tar.gz version into your user folder.

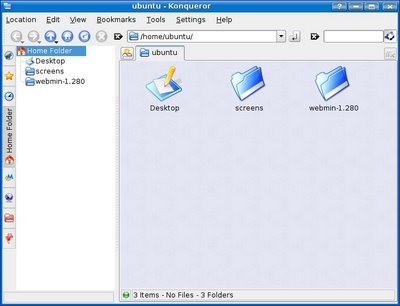
Once the download is complete extract it to a folder for example \usr\webmin. I extracted it into my user folder in this tutorial because this is just a live CD so it doesn't really matter. You may delete the tar.gz file after you extract it as it is no longer needed.

Before you install it you will want the package "libnet-ssleay-perl". So open the terminal and run "sudo apt-get install libnet-ssleay-perl". Now navigate to the directory the folder is (For me it would be "cd /home/ubuntu/webmin-1.280") and then run the command "sudo sh setup.sh".

Config file directory [/etc/webmin]:
# Leave as default, or change as you wish

Log file directory [/var/webmin]:
# Leave as default, or change as you wish

Full path to perl (default /usr/bin/perl):
# Leave as default, or change as you wish

Web server port (default 10000):
# Leave as default or change it to what ever port you want.

Login name (default admin):
# Leave as default, or change as you wish

Login password:
# Choose a password, it will not display anything while you type

Password again:
# Self explanatory

Use SSL (y/n):
# Of course 'y'

Start Webmin at boot time (y/n):
# Once agian... 'y'

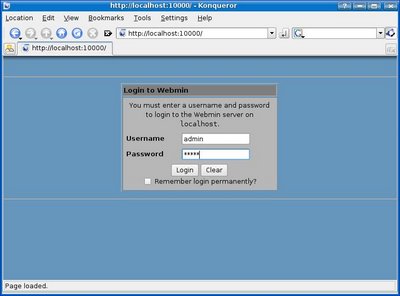
It will not finnish up the installation and you will be able to login by using localhost:port or routerip:port like http://localhost:10000

Masquerading
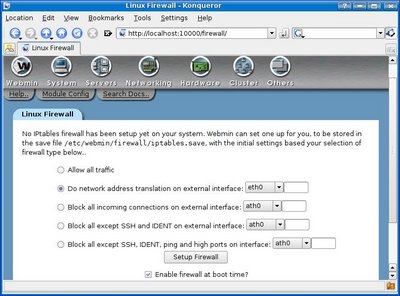
Masquerading is also known as NAT. To enable it, login to Webmin, go to the networking section, and click on firewall. It will ask you to configure it now. press "Do network address translation on external interface:" and choose the external interface (the one that is connected to the internet) and click on "Enable firewall at boot time?" then click on "Setup Firewall".

Now you must add rules to your firewall to allow traffic coming from the internal network, loopback, and traffic related to an outgoing connection (so that you may recieve a response to your requests).
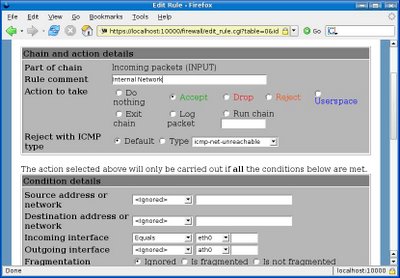
To allow traffic from the internal network, under "Incoming packets (INPUT)" press add rule. Give the rule a comment (name) like internal network and press the button by the "Accept" in green writing. Then down to "Incoming interface" put equals and put your internal interface, in the picture below it is eth0. Scroll down and press create.


Now do the same but put lo as incoming interface.

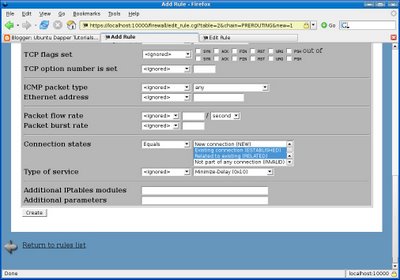
Now you must create another rule for existing connection. Put a comment and press accept. For incoming interface put equals and put your external interface (eth1 for me). Scroll down to "Connection States" and put equals and select both "Existing connection (ESTABLISHED)" and "Related to existing (RELATED)" and press create.

Now you must drop external connections that do not meet any of the other rules, so set the default action of "Incoming packets (INPUT)" to drop and press the button.

Scroll down to the bottom and press apply configuration.

Now go to the System section and click "Bootup and Shutdown". Click "Create a new bootup and shutdown action". Make the name "webmin-ipt" without quotes, make the description whatever you please, and for bootup commands, put "/bin/echo 1 > /proc/sys/net/ipv4/ip_forward" and make a new line and put "/sbin/iptables-restore /etc/webmin/firewall/iptables.save" then press create. Find the bootup command you just created in the list and click it then press Start Now.

Configure DHCP
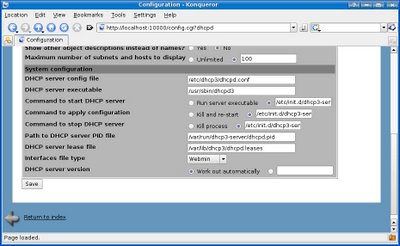
In webmin, go to servers and press DHCP Server and click Module Config.
Replace (without quotes)
DHCP server config file with "/etc/dhcp3/dhcpd.conf"
DHCP server executable with "/usr/sbin/dhcpd3"
Command to start DHCP server with "/etc/init.d/dhcp3-server start"
Command to apply configuration with "/etc/init.d/dhcp3-server restart"
Command to stop DHCP server with "/etc/init.d/dhcp3-server stop"
Path to DHCP server PID file with "/var/run/dhcp3-server/dhcpd.pid"
DHCP server lease file with "/var/lib/dhcp3/dhcpd.leases"
and press save.

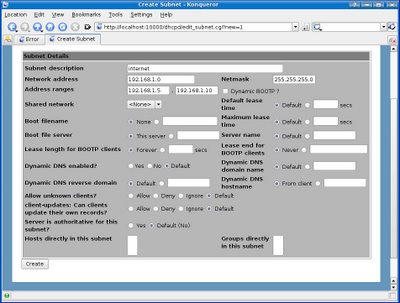
Now press "Add a new subnet" and put a description of this subnet. For network address, make it the same as the internal address but with 0 at the end, for example my internal NIC is 192.168.1.1 so I will put 192.168.1.0 for network address. For address ranges put the range of addrseses for your DHCP server to assign. For netmask put the same as your subnet, most are 255.255.255.0 and press create.

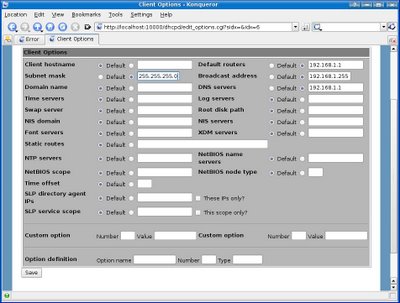
Once created, press the new icon that was just created with the network address you choose under it and scroll down to the bottom and click "Edit Client Options". Fill in Subnet mask with your subnet, default routers and dns servers with your internal IP and broadcast address with the internal ip but 255 at the end (for example my internal ip is 192.168.1.1 so I will put 192.168.1.255 for broadcast) and press save then press start server.

Your computer will now be a DHCP server, router, and DNS server. To do port forwarding, go to the firewall settings in webmin and go to the Network Address Translation (nat) IPTable. From there you can add rules to Packets before routing (PREROUTING).


Source: Ubuntu Linux

0
Ubuntu Networking for Basic and Advanced Users

The basics for any network based on *nix hosts is the Transport Control Protocol/ Internet Protocol (TCP/IP) combination of three protocols. This combination consists of the Internet Protocol (IP),Transport Control Protocol (TCP), and Universal Datagram Protocol (UDP).

By Default most of the users configure their network card during the installation of Ubuntu. You can however, use the ifconfig command at the shell prompt or Ubuntu’s graphical network configuration tools, such as network-admin, to edit your system’s network device information or to add or remove network devices on your system

Configuring Network Using Graphical Configuration Tool in Ubuntu


If you are new to networking the graphical configuration tool is your best method for configuring new hardware in Ubuntu.We are going to use GUI tool “network-admin” to configure networking. Remember, you must be root to run network-admin.


There are two ways to start network-admin first thing is you can use your terminal to type “sudo network-admin” it will start up or you can go to System—>Administration —>Networking


Once it opens you should see the following screen


In the above screen select wired connection and click on properties tab you should see the following screen my network card is curretly configured for DHCP client and you need to make sure “Enable this connection” tick box is checked


If you want to configure the Static ipaddress you need to select drop down box under “Configuration” select static ip address and you need to make sure “Enable this connection” tick box is checked


Once you select the static ip address you need to select ip address,subnet mask,gateway address and click on ok


Now you click on “General” tab here you can enter your hostname,domain name


Next one you need to click on “DNS” tab to configure your system’s DNS settings, hostname, or DNS search path.


Click the Hosts tab, and then either click the Add or Properties button (after selecting a host) to create or edit an entry in your system’s /etc/hosts file


Highlight an existing entry, and then click the Properties button to change /etc/hosts entries in the Hosts tab of the Network Configuration screen.


You can also assign different locations to your computer, especially very useful if you are on a laptop and move between several networks each requiring different configurations. Just select the gray bar at the top of the network-admin window and select Create Location. Enter a name, such as Home and then repeat this again to create another location, Work. Each time you switch between locations, Ubuntu detects that it needs to use configurations specific to those locations, so for instance you might want to use DHCP at work, but not at home. Simple; just select the Home location, configure your ethernet connection to use a Static IP and you are all set to switch between your home and corporate networks.


Configure Network Interface Using Command-Line

You can configure a network interface from the command line using the networking utilities. You configure your network client hosts with the command line by using commands to change your current settings or by editing a number of system files.

Configuring DHCP address for your network card

If you want to configure DHCP address you need to edit the /etc/network/interfaces and you need to enter the following lines replace eth0 with your network interface card

sudo vi /etc/network/interfaces

# The primary network interface – use DHCP to find our address
auto eth0
iface eth0 inet dhcp

Configuring Static IP address for your network card

If you want to configure Static IP address you need to edit the /etc/network/interfaces and you need to enter the following lines replace eth0 with your network interface card

sudo vi /etc/network/interfaces

# The primary network interface
auto eth0
iface eth0 inet static
address 192.168.3.90
gateway 192.168.3.1
netmask 255.255.255.0
network 192.168.3.0
broadcast 192.168.3.255

After entering all the details you need to restart networking services using the following command

sudo /etc/init.d/networking restart

Setting up Second IP address or Virtual IP address in Ubuntu

If you are a server system administrator or normal user some time you need to assign a second ipaddress to your Ubuntu machine.For this you need to edit the /etc/network/interfaces file and you need to add the following syntax.Below one is the only example you need to chnage according to your ip address settings

sudo vi /etc/network/interfaces

auto eth0:1
iface eth0:1 inet static
address 192.168.1.60
netmask 255.255.255.0
network x.x.x.x
broadcast x.x.x.x
gateway x.x.x.x

You need to enter all the details like address,netmask,network,broadcast and gateways values after entering all the values save this file and you need to restart networking services in debian using the following command to take effect of our new ipaddress.

After entering all the details you need to restart networking services using the following command

sudo /etc/init.d/networking restart

Setting your ubuntu stytem hostname

Setting up your hostname upon a ubuntu installation is very straightforward. You can directly query, or set, the hostname with the hostname command.

As an user you can see your current hostname with

sudo /bin/hostname

Example

To set the hostname directly you can become root and run

sudo /bin/hostname newname

When your system boots it will automatically read the hostname from the file /etc/hostname

If you want to know more about how to setup host name check here

Setting up DNS

When it comes to DNS setup Ubuntu doesn’t differ from other distributions. You can add hostname and IP addresses to the file /etc/hosts for static lookups.

To cause your machine to consult with a particular server for name lookups you simply add their addresses to /etc/resolv.conf.

For example a machine which should perform lookups from the DNS server at IP address 192.168.3.2 would have a resolv.conf file looking like this

sudo vi /etc/resolv.conf

enter the following details

search test.com
nameserver 192.168.3.2

Network Troubleshooting Tips

Networking is sometimes considered to be complex, and hard to troubleshoot and manage. However, Linux provides you with Some tools to figure out exactly what’s going wrong on your network, and how to fix it.Here we are going see some tools and how to check the network connectivity.

Ping

Ping is a computer network tool used to test whether a particular host is reachable across an IP network. Ping works by sending ICMP “echo request” packets to the target host and listening for ICMP “echo response” replies (sometimes dubbed “Pong!” as an analog from the Ping Pong table tennis sport.) Using interval timing and response rate, ping estimates the round-trip time (generally in milliseconds although the unit is often omitted) and packet loss (if any) rate between hosts.

This is very basic and powerful tool to check Internet connection

Example

ping -c 4 google.com

-c option is used to pass how many packets you’re sending

If everything working file you should get reply looks like below

Pinging www.l.google.com [64.233.183.103] with 32 bytes of data:

Reply from 64.233.183.103: bytes=32 time=12ms TTL=244

Ping statistics for 64.233.183.103:
Packets: Sent = 4, Received = 4, Lost = 0 (0% loss),
Approximate round trip times in milli-seconds:
Minimum = 12ms, Maximum = 12ms, Average = 12ms

Traceroute

traceroute is a computer network tool used to determine the route taken by packets across an IP network. An IPv6 variant, traceroute6, is also widely available.Very useful to trace IP packets.

Example

traceroute google.com

ifconfig

The Unix command ifconfig can function as a tool to configure a network interface for TCP/IP from the command line interface (CLI).This is another easy tool to see if your interface is actually loading correctly.

Example

ifconfig

eth0 Link encap:Ethernet HWaddr 00:0A:E6:C6:07:85
inet addr:132.18.0.16 Bcast:132.18.0.255 Mask:255.255.255.0
inet6 addr: fe80::20a:e6ff:fec6:785/64 Scope:Link
UP BROADCAST RUNNING MULTICAST MTU:1500 Metric:1
RX packets:18458 errors:0 dropped:0 overruns:0 frame:0
TX packets:8982 errors:0 dropped:0 overruns:0 carrier:0
collisions:0 txqueuelen:1000
RX bytes:4015093 (3.8 MiB) TX bytes:1449812 (1.3 MiB)
Interrupt:10 Base address:0xd400

Route

This is very useful to check routing config

Example

route -n

Netstat

If you want to see Routing Tables,all open ports,all listen ports

netstat -nr

-n means return numeric output (ie, IP address instead of hostname)

-r means print the routing table

find all open ports

netstat -a

find listening ports

netstat -l


Source: Debian Admin

1
Building a Linux home media center

Like a lot of people nowadays, I have a growing collection of digital media. My digital media is stored on a home Linux server. Most of the digital media players available today do not support protocols to connect to a Linux server, which make them unsuitable for my use. I realized the best way to connect my digital media library with my home theatre was to build my own Linux home media center (LHMC).


My LHMC would have to interface with my existing home configuration via a wireless network with WPA security enabled and output to my television's S-Video or composite inputs, and it would have to connect to my media server via NFS.

For my LHMC hardware I choose the MSI MEGA 180. One of its main attractions was that it is based on a Linux-supported Nvidia chipset and video card. The video card in this model has S-Video and composite outputs. The box has frontal USB and a built-in 6-in-1 media card reader. The MEGA 180 comes as a barebones product. I purchased one in an online auction with an AMD Athlon 2400+ processor, 60GB hard drive, and DVD player for about $350.

I choose to install Ubuntu Linux on the LHMC because, thanks to its Debian roots, Ubuntu is easy to update and manage, and has a wide range of software available. The low maintenance overhead it provides makes the LHMC behave as reliably as an embedded system. And the Ubuntu community offers many solutions and guides in its wiki and forums.

The Ubuntu installation detected all of the MEGA's hardware correctly. The only thing that was configured incorrectly after the installation was the default screen resolution. To configure the video, Ubuntu needed to be configured to get sources from the universe and multiverse repositories. This allowed for the installation of the binary Nvidia drivers. X.org needed to be set up to output through S-Video so it could display to my television. This process is well documented on Ubuntu's wiki. The Nvidia driver is also able to output in multiple HD standards.

Configuration of the wireless card was not as simple. The wireless card that comes with the MEGA 180 is an Ralink RT2460. Ralink makes some of the most open source-friendly wireless chipsets in existence, yet the rt2400 driver doesn't support WPA. I worked around this by using the ndiswrapper driver, which can support WPA though wpa_supplicant. I configured ndiswrapper with the Windows version of the Ralink drivers. To prevent the rt2400 driver from loading at startup and conflicting with the ndiswrapper kernel module, I created a file named wlan under /etc/modutils and entered the line alias rt2400 ndiswrapper.

The configuration of WPA is well laid out in an Ubuntu howto. Because I was using ndiswrapper, the interface name of the card was wlan0. wpa_supplicant must be configured to use the ndiswrapper driver, so the /etc/default/wpasupplicant file needed to have OPTIONS set like this:
OPTIONS="-i wlan0 -D ndiswrapper -c /etc/wpa_supplicant.conf"

With hardware setup nearly complete, one thing still bugged me. The MEGA's LED display shows the hardware clock's time, but Ubuntu defaults the hardware clock to UTC, so the MEGA's clock was always off by the difference between my local timezone and UTC. By grepping though the etc directory for the string "UTC," I discovered that the configuration option was in the file /etc/default/rcS. Changing the line UTC=yes to UTC=no resolved the issue.

All of my digital media is stored on an NFS share. To enable NFS mounting in Ubuntu, I installed the portmap package. I added the line mediaserver.example.com:/home/media /home/media noatime,rsize=32768,wsize=32768,bg 0 0 to /etc/fstab so that the media library would be mounted to /home/media at system startup.

Now that the LHMC had access to the media library, it was time to install the packages to enable playback of media: Rhythmbox for audio and Totem for video.

To configure Totem to play video, I installed the totem-xine package. The default backend, GStreamer, is automatically removed when you install the totem-xine package.

Audio playback was next. My Ogg music files played out of the box. The key to getting MP3 playback to work was installing libmad. I installed both libmad0 and gstreamer0.8-mad, and was able to play MP3 files. To fill any gaps that might come up, I also installed the gstreamer0.8-plugins-multiverse package, which includes all of the GStreamer plugins.

The LHMC has been rock solid since I set it up. It has handled all of the tasks that I planned to use it for and then some. The wow factor that I get when people visit is nice too.

Source: Linux.com

1
Merayakan Keragaman

Keragaman Budaya dan Etnis di Kota Bagansiapiapi

Bagansiapiapi merupakan kota kecil yang terletak di bagian Utara Provinsi Riau, Pesisir Selat Malaka dan dekat dengan perbatasan Provinsi Sumatera Utara."Pelabuhan ikan terbesar di dunia adalah Bagansiapiapi". Satu kalimat yang sangat mengesankan dan menimbulkan takjub mengetahui kalo’ pelabuhan ikan terbesar di dunia itu ada di pulau sumatera."yang terbesar di dunia" itu bukan status terakhir. Itu adalah kondisi di tahun 1940an yang sudah berubah banyak.

Saat Informasi yang lebih jelas kalo’ Bagansiapiapi adalah nama sebuah desa tua yang ada di pesisir selat malaka. Melihat gedung-gedung lama (peninggalan kolonial?) berdiri megah dengan arsitekturnya yang indah. Bangunan-bangunan lama yang terawat ini mengingatkanku pada daerah Bukit Kecil di Palembang.

Aku melihat Bagansiapiapi mirip dengan Malaka, bahkan lebih baik dan lebih potential dibandingkan Malaka untuk menjadi kota wisata. Dimana Bagansiapiapi sekarang sudah dihuni oleh banyak suku, etnis, agama serta budaya yang berbeda namun dalam merayakan keragaman ini mereka selalu saling menjaga dan saling menghormati perbedaan tersebut.

Nuansa chinese yang terasa kental bisa dijual sebagai ikon budaya yang menarik untuk pariwisata. Bangunan-bangunan tua kolonial bisa menjadi landscape yang menarik juga untuk pariwisata. Kotanya yang tertata rapi dan jalan-jalan kota yang bersih pun bisa menjadi daya tarik wisata yang menarik.

Bagansiapiapi, pelabuhan ikan terbesar di dunia, memang bukan ikon dunia lagi. Tapi aku melihat Bagansiapiapi memiliki corak yang berbeda dengan tempat lain. Bagansiapiapi menampilkan kekayaan budaya dan keragaman Indonesia. Bagansiapiapi bukti kekayaan Indonesia yang perlu dikembangkan untuk kemakmuran rakyat.

Untuk yang ingin tau tentang kota Bagansiapiapi silakan buka:
1. Bagansiapiapi Online Network
2. My Bagan in The World
3. Rokan Hilir
4. Bagansiapiapi Search

0
Puisi Ujie Caprone

Malam yang Sunyi

Di malam yang kian hening
Di tengah dingin yang menusuk kulit
Membuat hati tak bisa bergeming
Menghadapi cobaan yang kian membelit

Di tengah malam yang sunyi
Di kegelapan yang kian sepi
Ku ingin teteskan air mata
Menghadapi kesedihan yang terus menerpa

Tapi kupercaya
Dialah satu-satunya yang Maha Kuasa
Yang bisa menentramkan jiwa
Menenangkan hati yang berduka

Aku tak ragu
Dialah satu-satunya yang Maha Tahu
Selalu terjaga dan tak pernah tertidur
Melindungi hamba-hamba-Nya yang bersyukur


ASA


Jika kenangan&jarak menjadikanmu
acuan tuk jalan bahagiamu
mungkin aku tak berarti bagimu..

Namamu mengukir luka
Di setiap rongga dada
Aku mengalah,karena cinta
Adalah sayap..terbanglah bersamanya
Harapku musnah lebur tak tesisa

Aku di sini
kan tetap sendiri..


Aku Masih Ingin Hidup!

Aku seorang yang aktif dan dinamis.
Hidup kupandang dengan amat manis.
Aku manusia yang selalu berfikir positif dalam segala hal.
Hingga saat ini, belum satupun ujian Tuhan yang belum kulalui.

Kehidupanku memang menyenangkan.
Pacar yang baik dan pengertian walau sedikit suka tebar pesona karena dia memang cantik(dulu).
Kos yang nyaman, walau ibu kos paling sulit mentolerir ketelatan bayar uang sewa.
Juga teman-teman kos yang menyenangkan dan selalu membantuku bila ada kesulitan.

Hari-hariku diisi dengan mengisi kekosongan dibangku kuliah dan berkeliaran didunia maya.
Dibangku kuliah kuisi dengan mempelajari apa yang gak kuingini namun ku selalu tersenyum,
di dunia maya kuisi kekosongan hati ini untuk mencari dan terus mencari apa yang menjadi keinginanku.
Ilmu, pertemanan, dan tak jarang aku punya musuh didunia maya ini..

Namun kehidupanku berubah total.
Jadi sering murung dan tidak menikmati hidup ini lagi.
Entah kenapa aku menjadi sangat pesimis memandang masa depanku,
Padahal sudah kurancang matang-matang.
Setelah punya cukup uang, aku akan menikahi kekasihku dan hidup bahagia dengannya,
serta mimpi-mimpi lainnya, yang indah-indah. Tetapi, aku kembali tertunduk lesu.

Yang ku raih hanyalah celaan, makian, dan hinaan.
Aku sendiri sadari banyak kekurangan yang belum bisa kuraih.

0
Twitter

Cuma update-update status doang kan?

Twitter cuma update-update status memang benar. Akan tetapi ada loh kegunaannya dan banyak banget! Contoh: Kamu memfollow Artis yang kamu bener-bener fans, maka setiap artis itu update tentang status mereka, kamu jadi tau semuanya.

Begitu juga dengan kamu, kalau kamu memiliki Followers, dan kamu bertanya-tanya sesuatu lewat status, barang kali Followers kamu akan membantu menjawab pertanyaan kamu. Intinya semakin kamu memiliki Followers & Follow banyak orang, semakin banyak Info yang bisa kamu dapat

RT itu apa sih?
RT itu adalah ReTweet.
Maksud Retweet gimana?? ; baca aja disini ya

Berikut ada beberapa aplikasi untuk twitteran:
- Dari BB:
1. ubertwitter (bisa automatic rt)
2. twixtreme (bisa automatic rt)
3. twitterberry (bisa automatic rt)

- dari hape :
1. snaptu (bisa automatic rt)
2. dabr (bisa automatic rt)
3. Mobile Tweete (bisa automatic rt)
4. mobile web

- desktop:
1. powertwitter
2. destroyTwitter
3. twihrl
4. digsby
5. echofon (for mozzila firefox user)
6. tweetdeck (dekstop dan hape)

- Dari web (komputer)
1. twitzap(bisa automatic rt)
2. twitscoop
3. dabr (bisa di hape sm di komputer)

itu yang saya dapat dari Kaskus selebihnya cari sendiri ya di disini

0
Suku Maya

Suku Maya adalah kelompok suku yang tinggal di semenanjung Yucatan, Amerika Tengah yang berbatasan dengan Samudera Pasifik di sebelah barat, dan Laut Karibia di sebelah timur. Suku yang pada zaman batu mencapai kejayaan di bidang teknologinya (250 M hingga 925 M), menghasilkan bentuk karya dan peradaban unik seperti bangunan (Chichen Itza), pertanian (kanal drainase), tanaman jagung dan latex, sumurnya yang disebut "cenotes".

Cara mereka berkomunikasi dan mendokumentasikan tulisan:
Tulisannya menggunakan gambar dan simbol, yang disebut "glyph".
Ada dua macam glyph: yakni yang menampilkan gambar utuh dari benda yang dimaksudkan, dan tipe yang menggambarkan sesuatu sesuai dengan suku katanya.


Misalnya kata "balam: jaguar", digambarkan dengan kepala binatang tersebut, atau dengan tiga suku kata "ba"-"la"-"ma" yang terdiri dari tiga gambar sejenis mangkok/tempurung.

Suku ini juga mengenal kecantikan seseorang, dengan membuat tempurung kepalanya menjadi rata, dengan cara mengikatkan papan di dahi dan tempurung belakang pada bayi/kelahiran anak, sehingga pada waktu dewasa mereka merasa anggun dengan memiliki tulang dahi yang rata.

Adapun senjata yang digunakan adalah disebut "Atlatl" , yakni semacam busur dan panahnya.

Makanan utama mereka adalah: Tortilla.


Kalender Suku Maya
Pernah dengarkan mengenai mitologi-mitologi setiap bangsa didunia,misalnya mitologi perdaban China,Mesir,Sumeria,Yunani,dsb. Nah,dikisahkan didalam beberapa mitologi-mitologi tsb bahwa bumi ini pernah dilanda banjir dahsyat yang mengerikan,hampir semua peradaban-peradaban zaman dulu ada cerita tentang bencana yang satu ini,misalnya diantara lebih dari 130 suku Indian di Benua Amerika hampir tidak ada suku yang tidak memitoskan banjir dasyat sebagai topik.

Kalau mau lebih mudahnya,coba ingat-ingat Kisah Nabi Nuh (Noah).Dikisahkan didalam Al-Qur’an maupun Bible, bahwa seluruh peradaban manusia pada saat itu musnah,terkecuali bagi orang-orang yang percaya pada ajaran Alllah yang disampaikan oleh Nabi Nuh yang selamat dari bencana air bah yang maha dasyat itu.

Di sekitar pedalaman kaki Gunung Himalaya, Tibet misalnya, orang-orang menjumpai sebuah suku, keturunan dan rupa mereka hampir mirip dengan orang Yunani. Konon katanya, mereka adalah orang-orang yang beruntung masih hidup atas peristiwa banjir yang dahsyat itu.

Pada tahun 1986, kantor berita pemerintah Turki menyatakan bahwa 5.200 meter di atas permukaan laut puncak gunung (Ararat), telah ditemukan sebuah benda yang mirip dengan perahu Nabi Nuh yang berbentuk persegi empat, lalu mengambil gambarnya dari angkasa, dan panjang perahunya sesuai dengan yang dicatat dalam kitab suci.

Mister Li Hongzi (pendiri Fulun Gong/Fulun Dafa) menerangkan dalam ceramah Alam Semesta-nya,Beliau menuturkan bahwa peradaban dimuka bumi ini setidaknya telah dihancurkan kurang lebih sebanyak empat kali oleh Sang Pencipta. Dan,pada saat era dimana kita hidup sekarang ini, merupakan masa kehidupan peradaban umat manusia ke-5 dibumi.

Lalu kenapa manusia bisa mengalami bencana itu? Mitologi dari setiap negara mempunyai penjelasan yang sama terhadap hal ini. Semua ini dikarenakan kemerosotan dan kebejatan manusia, lalu Sang Penguasa Alam Semesta memutuskan untuk menghukum manusia.

Mengenai penggambaran atas peristiwa dimusnahkannya beberapa peradaban-peradaban manusia masa silam ,sebenarnya bisa kita peroleh penjelasannya dari beberapa Hadist. Pernah aq membaca sebuah hadist riwayat (lupa tapi hadist riwayat siapa),disitu dikisahkan pada zaman nabi-nabi terdahulu,ada yang disebut sebagai zaman edan dan zaman apa gitu deh (intinya setiap manusia pada zaman ini kembali fitrah), sehabis zaman edan akan kembali lagi ke zaman fitrah sampai saatnya tiba alam semesta ini benar-benar akan dihancurkan secara keseluruhan. Nah, dari isi hadist tsb dapat kita peroleh penjelasan,bahwa ketika suatu zaman dimana manusia telah menunjukkan kemerosotan moral yang luar biasa (zaman edan),Sang Penicipta memutuskan untuk mengahiri peradaban tersebut dengan mengirimkan beberapa bencana besar yang ahirnya mengakhiri kehidupan dimuka bumi pada saat itu. Hanya beberapa oranglah yang disisakan untuk memulai peradaban baru selanjutnya.Pada waktu peradaban baru ini lahir,hati orang-orang yang berhasil terselamatkan tersebut kembali dalam keadaan bersih/fitrah (setelah bertobat) karena telah disadarkan oleh rentetan bencana mengerikan yang menimpanya dimasa silam.(mohon dikoreksi lagi yah hadistnya)

Siklus seperti itu terus menurus berlangsung sampai pada masa peradaban kita saat ini (masa peradaban umat manusia ke-5/matahari ke-5). Pada saat ini,dimana tanda-tanda zaman edan telah dapat terlihat dengan begitu jelas,mungkin kembali saatnya peradaban pada saat ini harus kembali diakhiri,dan akan digantikan dengan sebuah peradaban baru yang tidak ada hubungannya sama sekali dengan peradaban sebelumnya.(mungkin manusia-manusia yang akan datang akan mengenal sisa-sisa peradaban kita sebagai sebuah peradaban maju yang hilang ditelan masa,seperti halnya kisah mengenai peradaban Atlantis dan Lemuria yang tenggelam dimasa silam)

Kini muncul pertanyaan,apa hubungannya peradaban ke-5 dimuka bumi ini dengan tahun 2012??

Pada sistem penanggalan didalam Kalender Bangsa Maya/Maya Calendar yg merupakan kalender paling akurat sampe sekarang yg pernah ada di bumi.(Perhitungan Maya Calendar dari 3113 SM sampai 2012 M) ,mereka (Bangsa Maya) menyatakan pada tahun 2012,tepatnya tanggal 21 Desember 2012,merupakan “End of Times”. maksud dari “End of Times” itu sendiri masih diperdebatkan oleh para ilmuwan, dan arkeolog.

Ada yang menyatakan bahwa maksudnya adalah :
1. Berhentinya waktu (bumi berhenti berputar)
2. Peralihan dari Zaman Pisces ke Aquarius
3. Peralihan dari Abad Silver ke Abad keemasan
4. End of Times = End of the World as we know it
5. Akan ada sebuah galactic Wave yang besar, yang memberhentikan semua kegiatan di muka bumi ini, termasuk kemusnahan manusia
6. Perubahan dari dimensi 3 ke dimensi 4, bahkan 5
7. Kehidupan manusia meningkat dari level dimensi 3, ke 4, DNA manusia meningkat dari strain 2 ke 12, sehingga manusia dapat menggunakan telepati bahkan telekinesis
8. Ada yang menyatakan tidak akan terjadi apa-apa
9. Ada yang menyatakan waktu sudah tidak akan berlaku, jadi waktu tidak linear, tetapi bisa berubah2, sesuai dengan waktu yang kita alami, karena ditemukannya mesin waktu
10. Ditemukannya mesin waktu dan stargate
11. Manusia sudah dapat melakukan transportasi ke galaxi lain, melalui stargate
12. Bangkitnya messiah, yang akan menyelamatkan manusia dari kehancuran
13. Kebangkitan Isa AS / Jesus
14. First Contact pertama kali peradaban manusia dengan Alien/UFO
15. Manusia bergabung dengan komunitas antar galaxi pertama kali, manusia = galaxy being.

Dalam kalender bangsa Maya yang sangat tersohor itu, diramalkan bahwa pada periode 1992-2012 bumi akan dimurnikan, selanjutnya peradaban manusia sekarang ini akan berakhir dan mulai memasuki peradaban baru.

Dalam sejarah peradaban kuno dunia, bangsa Maya dikenal menguasai pengetahuan tentang ilmu falak yang khusus dan mendalam, sistem penanggalan yang sempurna, penghitungan perbintangan yang rumit serta metode pemikiran abstrak yang tinggi. Kesempurnaan dan akurasi dari pada penanggalannya membuat orang takjub.

Sekelompok masyarakat yang misterius ini tinggal di wilayah selatan Mexico sekarang (Yucatan) Guetemala, bagian utara Belize dan bagian barat Honduras. Banyak sekali pyramid, kuil dan bangunan-bangunan kuno yang dibangun oleh Maya yang masih dapat ditemui di sana. Banyak juga batu-batu pahatan dan tulisan-tulisan misterius pada meja-meja yang ditinggalkan mereka.

Para arkeolog percaya bahwa Maya mempunyai peradaban yang luar biasa. Hal itu bisa dilihat dari peninggalannya seperti buku-bukunya, meja-meja batu dan cerita-cerita yang bersifat mistik. Tetapi sayang sekali buku-buku mereka di perpustakaan Mayan semuanya sudah dibakar oleh tentara Spanyol ketika menyerang sesudah tahun 1517. Hanya beberapa tulisan pada meja-meja dan beberapa system kalender yang membingungkan tersisa sampai sekarang.

Seorang sejarahwan Amerika, Dr. Jose Arguelles mengabdikan dirinya untuk meneliti peradaban bangsa ini. Ia mendalami ramalan Maya yang dibangun di atas fondasi kalender yang dibuat bangsa itu, dimana prediksi semacam ini persis seperti cara penghitungan Tiongkok, ala Zhou Yi. Kalendernya, secara garis besar menggambarkan siklus hukum benda langit dan hubungannya dengan perubahan manusia. Dalam karya Arguelles, The Mayan Factor: Path Beyong Technology yang diterbitkan oleh Bear & Company pada 1973, disebutkan dalam penanggalan Maya tercatat bahwa sistim galaksi tata surya kita sedang mengalami ‘The Great Cycle’ (siklus besar) yang berjangka lima ribu dua ratus tahun lebih. Waktunya dari 3113 SM sampai 2012 M. Dalam siklus besar ini, tata surya dan bumi sedang bergerak melintasi sebuah sinar galaksi (Galatic Beam) yang berasal dari inti galaksi. Diameter sinar secara horizontal ini ialah 5125 tahun bumi. Dengan kata lain, kalau bumi melintasi sinar ini akan memakan waktu 5125 tahun lamanya.

Orang Maya percaya bahwa semua benda angkasa pada galaksi setelah selesai mengalami reaksi dari sinar galaksi dalam siklus besar ini, akan terjadi perubahan secara total, orang Maya menyebutnya, penyelarasan galaksi (Galatic Synchronization). Siklus besar ini dibagi menjadi 13 tahap, setiap tahap evolusi pun mempunyai catatan yang sangat mendetail (ke 13 tahap tersebut akan saya jelaskan di kemudian hari). Arguelles dalam bukunya itu menggunakan banyak sekali diagram-diagram untuk menceritakan kondisi evolusi pada setiap tahap. Kemudian setiap tahap itu dibagi lagi menjadi 20 masa evolusi. Setiap masa itu akan memakan waktu 20 tahun lamanya.

Dari masa 20 tahun antara tahun 1992-2012 itu, bumi kita telah memasuki tahap terakhir dari fase Siklus Besar, bangsa Maya menganggap ini adalah periode penting sebelum masa pra-Galatic Synchronization, mereka menamakannya: The Earth Generetion Priod (Periode Regenerasi Bumi). Selama periode ini bumi akan mencapai pemurnian total. Setelah itu, bumi kita akan meninggalkan jangkauan sinar galaksi dan memasuki tahap baru: penyelarasan galaksi.

Pada 21 Desember 2012 akan menjadi hari berakhirnya peradaban umat manusia kali ini, dalam perhitungan kalender Maya. Sesudah itu, umat manusia akan memasuki peradaban baru total yang tidak ada hubungannya sama sekali dengan peradaban sekarang. Pada hari itu, tepatnya musim dingin tiba, matahari akan bergabung lagi dengan titik silang yang terbentuk akibat ekliptika (jalan matahari) dengan ekuator secara total. Saat itulah, matahari tepat berada di tengah-tengah sela sistem galaksi, atau dengan kata lain galaksi terletak di atas bumi, bagaikan membuka sebuah “Pintu Langit” saja bagi umat manusia.

Mulai 1992, bumi memasuki apa yang oleh bangsa Maya disebut ‘Periode Regenerasi Bumi”. Pada periode ini, Bumi dimurnikan, termasuk juga hati manusia, (ini hampir mirip ramalan orang Indian Amerika-Utara terhadap orang sekarang ini), subtansi yang tidak baik akan disingkirkan, dan substansi yang baik dan benar akan dipertahankan, akhirnya selaras dengan galaksi (alam semesta), ini adalah singkapan misteri dari gerakan sistem galaksi kita yang diperlihatkan oleh bangsa Maya.

Sejak tahun 1992 sampai 2012 nanti, bagaimana terjadi “pemurnian” dan bagaimana pula terjadi “regenerasi” pada bumi kita ini, tidak disebutkan secara detail oleh bangsa Maya. Dalam ramalan mereka pun tidak menyinggung tentang apa hal konkret yang memberikan semangat manusia untuk bangkit dari kesadaran dan bagaimana bumi mengalami permurnian, yang ditinggalkan oleh mereka kepada anak cucunya (barangkali tidak tercatat). Lantas, fenomena baru apa yang sudah bisa kita lihat sejak tahun 1992 sampai sekarang yang bisa kita kaitkan dengan ramalan bangsa Maya yang beradab itu?

Mungkin sudah diatur, bahwa kalender Maya tidak hilang dan sejarah manusia, dan harus diuraikan dengan kode oleh manusia sekarang. Namun ia tetap saja harus dilihat, apakah umat manusia yang terpesona oleh konsepsinya yang trerbentuk sesudah kelahiran dapat menembus batas-batas untuk mengingatkan dan memahami kebenaran yang melampoi sistim pengetahuan kita.

Sebenarnya,jika ditinjau dari beberapa penelitian yang telah dilakukan saat ini.Memang pada beberapa dua dasawarsa belakangan ini,bumi sedang mengalami suatu siklus yang dinamakan pembalikan daya magnet kutub. Pembalikan daya magnet kutub adalah proses yang terjadi pada waktu kutub utara dan kutub selatan saling bertukar posisi. Ketika ini terjadi, untuk beberapa saat medan magnet bumi mencapai Gauss nol, yang berarti bumi pada waktu itu punya daya magnet nol. Ketika ini terjadi bersamaan dengan perbalikan orbit sebelas tahunan kutub matahari, masalah besar akan terjadi.

Menurut perhitungan computer Hyderabad, pembalikan kutub Bumi dan Matahari dapat mengakibatkan masalah besar selain elektronik tidak bekerja dengan semestinya, burung yang bermigrasi kehilangan haluan, dan bermacam macam:

1. Sistem ketahanan tubuh semua hewan dan termasuk manusia akan banyak melemah. 2. Lapisan luar bumi akan mengalami pertambahan gunung berapi, pergerakan tektonik, gempa bumi, dan tanah longsor. 3. Medan magnet Bumi akan melemah dan radiasi alam semesta berasal dari matahari bertambah berlipat ganda mengakibatkan bahaya radiasi seperti kanker dan sebagainya tidak dapat dihindari 4. Benda-benda angkasa akan tertarik masuk ke Bumi 5. Daya gravitasi Bumi akan mengalami perubahan meskipun tidak diketahui bagaimana ia akan berubah

Jika anda menambahkan semua skenario bencana yang mungkin terjadi, anda dapat dengan mudah mengatakan dengan kalimat sederhana ini, Bumi dapat menjadi tempat yang tidak cocok untuk ditinggali peradaban manusia pada 2012 ataupun mereka yang hidup dekat lapisan luar bumi. Hal ini mungkin saja dapat terjadi pada Mars jutaan tahun yang lalu.

Mungkin benar adanya apa yang dikatakan Bangsa Maya mengenai kehancuran perdaban manusia di tahun 2012 esok,hal tersebut tentunya dapat kita lihat dari sifat-sifat manusia zaman sekarang yang tau sendirikan bagaimana moralnya,kelakuan,dll, dan alam-pun kelihatannya semakin tidak bersahabat dengan kita.

Yang lebih menarik lagi kali ini aq coba mengutip pernyataan si Mama Louren (tau kan,peramal yang suka muncul di Tipi itu lo).Kata dia,”pada tahun 2012 nanti jumlah penduduk di Indonesia ini tinggal 40%”.Lalu ketika ditanya apa penyebabnya,dia menuturkan ,”pada tahun itu sebuah bencana besar akan melanda Bumi secara Global,mungkin pada setiap negara nantinya hanya menyisakan 30%-40% kehidupan untuk kembali membangun kehidupan baru”.

Ramalan serupa juga diutarakan oleh Beberapa Biksu di Tibet yang terkenal pengan penguasaan clairvoyance-nya yang sangat baik.Mereka mengatakan pada awal tahun 2012 merupakan tahun paling mendebarkan bagi umat manusia di muka Bumi,dimana pada permulaan tahun,beberapa fenomena aneh akan banyak bermunculan.Namun dalam penutupnya,Para Biksu mengatakan Bumi akan terselamatkan oleh sebuah kekuatan besar yang melindungi mereka secara kasat mata,sehingga memungkinkan peradaban manusia tidaklah sepenuhnya musnah.

Kalau menurutku pribadi,tidak ada seorangpun yang bisa meramalkan kapan tepatnya kiamat itu datang.Tapi dilain sisi,aq percaya akan regenarasi suatu peradaban yang diramalkan para Orang Bangsa Maya ditahun 2012 nanti.Ini bukanlah suatu kehancuran Alam semesta secara keseluruhan (Jadi belum bisa diartikan kiamat yang sebenarnya),mungkin nantinya secuil para manusia-manusia yang terselamatkan dari bencana akan kembali membangun tonggak peradaban baru yang lebih baik dan lebih bermoral daripada kita.Wallahualam bi shawab.Tapi intinya,mau kiamat itu datangnya kapan,pokoknya mulai sekarang kita harus wajib bertobat dan lebih mendekatkan diri kepada-Nya.

Telah aku uraikan diatas, bahwa siklus penyelarasan Galaksi ini memang terjadi setiap 5125 tahun sekali,titik permulaannya adalah pada tahun 3113 SM dan mencapai titik puncaknya di tahun 2012 M (3113 + 2012 = 5125). Selama siklus besar ini berjalan, setidaknya ada 13 tahap paling utama yang dilalui oleh kehidupan Manusia diantara jenjang waktu 5125 tahun itu.

Tahap paling awal dari siklus tersebut dimulai dari yang paling kiri yaitu Baktun of The Star Planting,kemudian dilanjutkan oleh tahap berikutnya sampai ahirnya memasuki tahap ahir yang disebut Baktun Transformation of Matter (paling kanan).

Pada setiap Baktun terdiri dari 144,000 hari.Namun sampai saat ini belum ada kepastian mengenai kapan tepatnya tanggal perputaran Baktun ini dimulai.Para Sarjana banyak yang berbeda pendapat mengenai hal ini,ada yang mengatakan mulai bergulir pada tanggal 13 Agustus 3113 SM,ada juga yang mengatakan 11 Agustus 3113 SM.

Nantinya,disetiap Baktun akan diuraikan beberapa kejadian besar yang pernah dan yang akan dilalui oleh peradaban manusia ke-5 dibumi ini,yaitu dimulai dari Baktun pertama (3113 SM) sampai Baktun paling puncak/terakhir (2012 M).

Sekarang akan saya perjelaskan satu persatu.
1.Baktun 0 = “Baktun of the Star Planting” (Periode 3113-2718 SM) 13.0.0.0.0 *Masuknya Bumi pada “Galactic Synchronization Beam” tahap awal *Masuknya Bumi pada siklus “Star transmission” baru di alam semesta *Peradaban manusia baru (ke-5) dimulai *Bangsa Mesir Kuno muncul 3100 SM *Expansi Sumeria 3000 SM *Kontruksi awal Pembangunan Stonehenge dimulai 2800 SM

2.Baktun 1 = “Baktun of the Pyramids” (Periode 2718-2324 SM) 1.0.0.0.0 *Konstruksi awal pembangunan Great Pyramid Giza 2700-2600 SM *Penyebaran Peradaban Sumeria di Timur Tengah *Pengembangan perkakas Perunggu *Peradaban Harapa India dimulai *Masa becocok tanam berkembang pesat di China,Mesoamerica,dan Andes

3.Baktun 2 = “Baktun of the Wheel” (Periode 2324-1930 SM) 2.0.0.0.0 *Roda ditemukan *Alat transportasi beroda muncul *Code hukum ditulis *Mulainya Imperium Babilonia pertama *Era of Legendary Emperors China *Peradaban Minoa,Crete dimulai

4.Baktun 3 = “Baktun of the Sacred Mountain” (Periode 1930-1536 SM) 3.0.0.0.0 *New Kingdom di Mesir *Kerajaan Mesir mengabadikan mengenai kekuasaan keturunan Raja,memperkuat pola defensif territorial sebagai norma untuk kehidupan yang beradab *Hancurnya peradaban Minoan (peradaban indus) oleh Bangsa Arya

5.Baktun 4 = “Baktun of the Shang” (Periode 1536-1141 SM) 4.0.0.0.0 *Dinasti Shang China berdiri,doktrin pengucapan Yin Yang,Kemajuan pengetahuan akan pengolahan perunggu *Peradaban Vidic India dimulai *Kemunculan Peradaban Chavin,Olmec,Mesoamerica *Masa kenabian Ibrahim sampai Musa *Munculnya peradaban Mesopotamia

6.Baktun 5 = “Baktun of the Imperial Seal” (Periode 1141-747 SM) 5.0.0.0.0 *Imperium Babilonia-Assyirian dimulai *Perkenalan persenjataan Besi *Kenaikan mycenean Yunani di Mediterania *Awal Dinasti Chou di China *Kuda digunakan pertamakali untuk berperang,dan munculnya pola gemar berperang pada setiap kerajaan

7.Baktun 6 = “Baktun of the Mind Teachings” (Periode 747-353 SM) 6.0.0.0.0 *Gelombang periode pertama Peradaban Maya di Mesoamerika *Imperium Persia dimulai *Zaman-zaman bagi para filusuf Yunani (Plato,Socrates dan Aristoteles) *Six Schools of Vedic thought *Mahavira dan Budha,kehidupan Confucius,Lao Tze,Chang Tzu di China *Sistem Kalender Bangsa Maya diciptakan

8.Baktun 7 = “Baktun of the Annoited One” (Periode 353 SM - 41 M) 7.0.0.0.0 *Alexander The Great,Rise of Rome *Teknologi Besi diperkenalkan *Permulaan Dinasti Han *Konstruksi The Great Wall China *Penyebaran Budha sebagai Agama Cosmopolitan di India sampai Central Asia *Masa Kenabian Isa Almasih/Yesus Kristus *Difusi Olmec dan permulaan dari Teotihuacan

9.Baktun 8 = “Baktun of The Lords of Red and Black” (Periode 41-435 M) 8.0.0.0.0 *Konstruksi ahir Piramida Teotihuacan *Konsolidasi rezim kebudayaan Mesoamerika *Ajaran Lord and Black pertama muncul di Quetzalcoatl *Peradaban Nazca dan Easter Island *Ekspansi dan masa kemunduran Kerajaan Romawi *Munculnya Kristen sebagai suatu keyakinan/agama *Dinasti Han runtuh *Budha tersebar ke wilayah Asia Tenggara

10.Baktun 9 = “Baktun of The Maya” (Periode 435-830 M) 9.0.0.0.0 *Gelombang kedua Galactic Maya Civilization *Masa Kenabian Muhammad SAW dan munculnya Islam sebagai suatu keyakinan/agama *Kristen menyebar ke Eropa,Kristen Romawi di Eropa Barat dan Ortodoks di Eropa Timur *Hindu menjadi agama dominan di India *Ajaran Budha tersebar ke wilayah Korea dan Jepang *Masa Dinasti T’ang *Kejayaan Kerajaan2 di wilayah Asia Tenggara,Indonesia *Kedudukan penting Tiahuanaco,Andes *Munculnya peradaban Polinesia,Oceania dan Nigeria

11.Baktun 10 = “Baktun of the Holy Wars” (830-1224 M) 10.0.0.0.0 *Kehancuran Peradaban Maya dan Central Mexico *Masa keemasan peradaban Toltecs *Munculnya peradaban Chimu di Andes *Perang salib *Berjayanya peradaban Tibet *Munculnya Peradaban Khemer di Asia Tenggara

12.Baktun 11 = “Baktun of Hidden Seed” (1224-1618 M) 11.0.0.0.0 *Penyebaran Islam Ke India , Asia Tenggara , dan Afrika Barat *Kejayaan Orang-orang Turki *Puncak perkembangan Kristen di Eropa Barat *Puncak perkembangan Kristen Ortodoks di Eropa Timur *Peradaban Eropa berhasil menaklukkan Bangsa Inca dan Aztec

13.Baktun 12 = “Baktun of The Transformation of Matter” (Periode 1618-2012 M) 12.0.0.0.0 *Zaman Imperialisme dan Kapitalisme *Revolusi Industri *Revolusi Amerika *Kolonialisme di Afrika,Amerika Latin dan Asia *Revolusi Prancis *Industrialisasi di Jepang *Paham Marxisme oleh Karl Marx *Revolusi Komunis Rusia dan China *Perang Dunia 1 dan 2 meletus,era bom atom *Era Nuklir dimulai *Teror mulai merajalela secara global *Kejayaan Islam dan Munculnya kekuatan baru di India dan Timur Tengah *Mulai tidak stabilnya peradaban di Bumi *Bumi memasuki era ahir global regeneration *Bumi memasuki Zona Photon tahap ahir *Ahir Galactic Synchronization (December 2012)

Jika kita lihat dari siklus Baktum diatas,maka benar tahun 2012 merupakan titik ahir dari Galactic Synchronization dan Zona Photon.Coba perhatikan pada uraian Baktun 12 diatas,yang aq garis bawahi dari Era Nuklir dan Ahir Galctic Sychronization merupakan tahun dimana saat ini kita masih bernafas,sampai jangka waktu tahun2 kedepannya (2008-2012).

Mungkin pengetahuan yang akan aq uraikan dibawah ini masih sangat asing kita dengar,namun tidak ada salahnya kan aq uraikan untuk memperluas wawasan kita

Zona Photon adalah daerah yang terdiri dari partikel cahaya photon. Cahaya photon adalah akibat dari tabrakan anti elektron dengan elektron. Tabrakan itu menyebabkan kedua partikel itu saling menghancurkan yang kemudian menimbulkan energi photon atau partikel cahaya. Kelak kemudian hari photon akan menjadi sumber energi utama untuk memenuhi kebutuhan energi, selain energi nuklir tentunya.

Sebenarnya ada suatu rahasia alam semesta yang selama ini mungkin belum diketahui oleh banyak orang. Seperti yang kita ketahui,bahwa setiap sistem galaksi dan tata surya tentu mempunyai suatu pusat,misalnya Galaksi Bima Sakti kita (The Milky Ways) yang berpusat pada Matahari. Tapi tahukah, bahwa selain berotasi mengelilingi matahari,konon Bumi juga mengintari suatu matahari pusat alam semesta (Central Sun) yang berada pada gugus bintang Pleiades. Semua bintang dan planet di alam semesta,tak terkecuali Matahari juga berputar mengitari Central Sun.Para Astronom menamai Central Sun ini ALCIONE.

Galaksi Kita (The Milky Ways) berikut planet-planetnya termasuk bumi memerlukan waktu 25.860 tahun untuk mengitari ALCIONE itu, maka tiap 12.500 tahun tata surya kita bertabrakan dengan Zona Photon. Untuk melintasi Zona Photon diperlukan 1000-2000 tahun.

Sejak 1961 tata surya kita sudah mulai memasuki Zona Photon. Dan akan berada di pusatnya pada tahun 2011-2012. Masuknya tata surya kita ke dalam zona photon akan memberikan dampak peningkatan frekwensi getaran bumi dan peningkatan kesadaran manusia, yang selanjutnya memicu perubahan besar dalam kehidupan di planet bumi.

Lalu apakah yang terjadi pada Bumi disaat masa-masa transisi tersebut?

Di tepi Zona Photon terdapat suatu dinding pembatas yang disebut Zona Nil. Di Zona Nil tersebut terjadi kompresi energi yang sangat dahsyat, di mana medan magnetik sangat padat sehingga segala sesuatu yang melintasi Zona tersebut pasti mengalami perubahan. Berarti juga medan magnetik bumi dan matahari akan berubah mengalami jenis magnetik yang baru., yakni magnetik interdimensional yang mengakibatkan perubahan drastis pada medan elektrik magnetis dan gravitasional bumi. Dapat dibayangkan pengaruhnya pada semua alat listrik yang kita kenali sekarang, semua tak akan berfungsi, Mobil dan pesawat tak dapat distarter, Pendingin ruangan akan mati total, Lampu-lampu listrik tak lagi menyala.

Selain itu,dampak peningkatan frekwensi getaran alam akibat energi photon akan meningkatkan aktivitas gelombang laut, gunung berapi, gempa bumi, perubahan cuaca/ilklim, pemanasan global dan terciptanya lobang-lobang ozon.

Diperkirakan penghuni bumi menghadapi suatu kehidupan dan kegelapan yang tak bisa dipahami diantara ahir Zona Photon nanti (2011-2012).

Hari 1-2: Matahari tidak bersinar dan bumi menjadi gelap gulita dan dingin yang dahsyat.
Hari 3-4: Tampak cahaya temaram, bagai fajar, bintang-bintang mulai muncul di langit
Hari 5-6. Menghadapi hari yang bercahaya benderang selama 24 jam terus menerus. Seluruh mahluk bangkit dengan semangat baru.Menerima energi baru. Kemampuan Supranatural muncul suatu Era zaman baru

Tanda-tanda taransisi mudah kita lihat dengan berbagai rentetan peristiwa yang ditayangkan media massa maupun media elektronik. Hidup yang semakin sulit dan banyak tantantangan dan masalah, masa depan yang suram, kehidupan sosial politik dan ekonomi yang hiruk pikuk dan heboh. Banyak orang yang gelisah dan dirundung kecemasan, dan tekanan jiwa, gelisah, kekalutan mental, tindakan kekerasan, kekejaman, atau pemberontakan untuk mencapai kebebasan dan reformasi.(Zaman Edan telah mencapai puncaknya)

Zona Photon dikenal juga dengan sebutan Nebula Emas. Dimana manusia akan menikmati zaman keemasan. Manusia-manusia yang dapat tetap hidup dan lolos dari tahap ahir Galactic Synchronization nanti akan memiliki tingkat kesadaran yang super . Mungkin inilah saatnya yang dinyatakan dalam Al-Qur’an maupun Bible bahwa manusia akan berubah dalam sekejap mata.

Kemampuan-kemampuan spiritual seperti telekenensis, clairvoyance, clairaudience dan kemapuan-kemampuan spiritual yang hanya dimiliki orang-orang tertentu akan menjadi milik setiap orang. Penghubi bumi akan menjadi mahluk superneing, atau manusia super.

Badan jasmani manusia yang berhasil melampaui masa transisi dan tetap hidup, akan mengalami perubahan. Kebutuhan jasmani juga berkurang, tidak seperti manusia jaman sekarang yang terlalu banyak menuntut gaya hidupnya. Kehidupan di Zaman Baru akan memberikan kekuasaan manusia berkesempatan dan berkemampuan untuk meremajakan diri jasmaninya dan hidup tanpa batas waktu. Bangsa Manusia Baru akan mempunyai pemimpin yang memiliki kesadaran multidimensional, memimpin manusia menuju kehidupan yang damai, sejahtera, dan bahagia sesuai dengan rencana Tuhan Sang Maha Pencipta.

Sejarah planet bumi dan asal-usul manusia akan terungkap. Sejarah yang selama ini dibayangkan atau ditemukan oleh ahli-ahli sejarah sangat berbeda dengan kejadian yang sesungguhnya.Akhirnya manusia akan memahami jati dirinya, tahu siapa dirinya di masa silam dan apa tugas serta takdirnya, tidak semata-mata sebagai manusia bumi, tetapi sebagai manusia galaktik yang memiliki kesadaran kosmik.
 
Ujie Caprone | © 2011 Blogger Template by Ujiecaprone.com