Tampilkan postingan dengan label Ubuntu. Tampilkan semua postingan

8
Setting PC Router pada Ubuntu

PC Router adalah memfungsikan sebuah PC agar dapat melakukan proses routing dari Local Area Network (LAN) ke Global Connection atau biasa juga disebut internet, dimana tentunya fungsi ini dapat memberikan sebuah gateway bagi kebutuhan Local Area Network (LAN).

Berikut adalah syarat untuk memfungsikan PC agar menjadi sebuah router gateway :
# PC Pentium IV + RAM 512
# LAN Card 2 buah
# Operating System Ubuntu Server
# Koneksi internet
# Ip Address, disini saya menggunakan ip address sebagai berikut :
# Ip Address dari
>> ISP (eth0) : 202.173.129.25/29 dengan DNS1 : 202.173.1.10 dan DNS2 : 202.173.1.20
# Ip Address untuk LAN (eth1) : 192.168.1.1/24

Langkah awal adalah setting ip address di ubuntu server, langkahnya sebagai berikut :
root@server:~# vim /etc/network/interfaces

# ISP Connection
auto eth0
iface eth0 inet static
address 202.173.129.26
netmask 255.255.255.248
network 202.173.129.24
broadcast 202.173.129.30
gateway 202.173.129.25


# LAN Connection
auto eth1
iface eth1 inet static
address 192.168.1.1
netmask 255.255.255.0
network 192.168.1.0
broadcast 192.168.1.255

Ssimpan dengan mengetikkan esc:wq dan enter

Selanjutnya harus diubah settingan dns, sebagai berikut :

root@server:~# vim /etc/resolv.conf

nameserver 202.173.1.10
nameserver 202.173.1.20

simpan dengan mengetikkan esc:wq dan enter

Jika ip address sudah kita setting pada interface eth0 dan eth1, selanjutnya kita coba test ping ke yahoo.com atau alamat lainnya :

root@server:~# ping yahoo.com


PING yahoo.com (209.131.36.159) 56(84) bytes of data.
64 bytes from b1.www.vip.sp1.yahoo.com (209.131.36.159): icmp_seq=1 ttl=47 time=228 ms
64 bytes from b1.www.vip.sp1.yahoo.com (209.131.36.159): icmp_seq=2 ttl=47 time=224 ms
64 bytes from b1.www.vip.sp1.yahoo.com (209.131.36.159): icmp_seq=3 ttl=47 time=225 ms
64 bytes from b1.www.vip.sp1.yahoo.com (209.131.36.159): icmp_seq=4 ttl=47 time=231 ms

Jika hasil ping sudah seperti di atas, maka koneksi internet untuk server sudah ok. Selanjutnya lakukan perintah update dan upgrade untuk ubuntu :

root@server:~# apt-get update && apt-get upgrade


Kemudian agar user LAN dapat berinternet, silahkan lakukan perintah sebagai berikut :

root@server:~# vim /etc/sysctl.conf


pada perintah ini silahkan cari tulisan #net.ipv4.conf.default.forwarding = 1 dan hilangkan tanda pagarnya sehingga menjadi net.ipv4.conf.default.forwarding = 1

simpan dengan mengetikkan esc:wq dan enter

Jangan lupa kita juga harus melakukan perintah sebagai berikut :

root@server:~# echo “1″ /proc/sys/net/ipv4/ip_forward


Dengan langkah diatas maka user LAN sudah dapat berkomunikasi antar user LAN, tetapi belum bisa melakukan komunikasi dengan global internet. Berikut adalah langkah yang harus dilakukan agar user LAN dapat berkomunikasi dengan global internet :

root@server:~# /sbin/iptables -t nat -A POSTROUTING -s 192.168.1.0/255.255.255.0 -d 0/0 -j MASQUERADE


Selanjutnya agar fungsi routing dapat otomatis berjalan saat kita restart pc server, maka kita harus save perintah routing tersebut di file /etc/rc.local, langkahnya sebagai berikut :

root@server:~# vim /etc/rc.local


echo “1″ /proc/sys/net/ipv4/ip_forward
/sbin/iptables -t nat -A POSTROUTING -s 192.168.1.0/255.255.255.0 -d 0/0 -j MASQUERADE


OK selesai..., selamat mencoba dan semoga berhasil

9
Install Ubuntu didalam Windows Melalui Wubi

Wubi adalah aplikasi didalam os ubuntu untuk menginstall Ubuntu didalam sistem operasi windows. Umumnya jika kita masukkan CD Installer Ubuntu kedalam Sistem operasi Windows yang aktif akan muncul secara otomatis/autorun.

Wubi juga mempermudah kita menginstal ke file di Windows tanpa melakukan booting untuk mempartisi linux. Pada saat instalasi ubuntu, Wubi dapat menggunakan file .iso dari Ubuntu Alternate CD, jadi tidak harus mengunduh dari internet. Jika Anda punya Alternate CD, Anda dapat mengubahnya menjadi file .iso, lalu menginstal ubuntu melalui Wubi dengan meletakkan file .iso itu di folder yang sama dengan file Wubi.exe. Jika tidak ada file .iso, maka Wubi akan mengunduh melalui internet.


Berikut langkah–langkah penginstallan Ubuntu menggunakan aplikasi Wubi langsung pada os windows:

Masukkan CD ubuntu Anda, secara otomatis akan diminta untuk memilih apakah anda ingin menginstall secara penuh atau menginstall di dalam Windows yang Anda gunakan saat ini pilih Option Install dalam Windows. Pilih "Install Inside Windows"


Kemudian Anda akan diminta untuk memilih partisi dimana anda akan menginstall Linux Ubuntu tersebut,memilih ukuran installasi, bahasa, nama pengguna dan password yang diinginkan. Setelah selesai mengisi klik pasang.


Installasi akan mengekstrak file dari CD ke folder partisi yang telah Anda pilih.Apabila installasi berjalan lancar Anda akan diminta untuk merestart komputer.Restart Komputer Anda dan pilih booting ke Ubuntu, setelah itu komputer akan melanjutkan installasinya seperti gambah di bawah ini.


Setelah Proses Instalasi diatas selesai, maka komputer akan diminta untuk restart kembali dan installasi ubuntu Anda telah selesai. Nah gampangkan..., tanpa susah payah anda sudah punya 2 os windows dan Ubuntu.

Semoga berhasil...!!!

2
How to Dual Monitors

Few weeks ago I became owner of new 22 inch monitor Samsung SyncMaster 225BW. I has plan to sell my old 19 inch HP1905, but today i decide to try dual monitor setup on my desktop PC. I’ve spent about 3 hours to get everything work and now I’m fully confident that two monitors are better than one.

There is a lot of guides and a few ways how-to configure multi monitor systems under Linux. Most of time i have try follow guides to get my system working, but reading documentation is always better ;-). Below you can find some tips about dual monitor setup. This post is not complete HOWTO, but maybe you can find some answers.


There is few ways to configure multi monitor systems and i have choose twinview, because that option is native feature of Nvidia drivers.Next you need comment out option Virtual under SubSection Display. That option respond for size of virtual desktop. Also you need add option “Viewport 0 0″ under same SubSection.

Both monitors connected to one video card GeForce 6600GT. SyncMaster connected with DVI and HP with VGA. System is Ubuntu 7.04 Beta, but all options will be valid on mostly all other systems.

First, as usual before any changes, you need backup current xorg.conf. Next open config in favourite editor, and add following lines under section Device:

Option "TwinView" "1"
Option "TwinViewXineramaInfoOrder" "DFP, CRT"
Option "UseDisplayDevice" "DFP, CRT"
Option "TwinViewOrientation" "DFP LeftOf CRT"
Option "NoPowerConnectorCheck"
Option "UseEdidFreqs" "1"
Option "Metamodes" "CRT-0: 1280x1024, DFP-0: 1680x1050"
Option "SecondMonitorHorizSync" "31-82"
Option "SecondMonitorVertRefresh" "56-76"

Here you can find complete description of used options. A lot of time spent to find how-to change order of displays (by default VGA display inits first). If that is OK for you, remove option TwinViewXineramaInfoOrder from config.


And a last change is under Section ServerLayout. Add following params:


Screen 0 "Default Screen" 0 0

Option "Xinerama" "Off"


Thats all. Save modified config, press Ctrl+Alt+Backspace to restart X server and enjoy your new desktop ;-) Feel free to ask any questions about configuration above. I will try to help you.


Here you can download my working xorg.conf


TwinView


Source : Zulu

0
Ubuntu Networking for Basic and Advanced Users

The basics for any network based on *nix hosts is the Transport Control Protocol/ Internet Protocol (TCP/IP) combination of three protocols. This combination consists of the Internet Protocol (IP),Transport Control Protocol (TCP), and Universal Datagram Protocol (UDP).

By Default most of the users configure their network card during the installation of Ubuntu. You can however, use the ifconfig command at the shell prompt or Ubuntu’s graphical network configuration tools, such as network-admin, to edit your system’s network device information or to add or remove network devices on your system

Configuring Network Using Graphical Configuration Tool in Ubuntu


If you are new to networking the graphical configuration tool is your best method for configuring new hardware in Ubuntu.We are going to use GUI tool “network-admin” to configure networking. Remember, you must be root to run network-admin.


There are two ways to start network-admin first thing is you can use your terminal to type “sudo network-admin” it will start up or you can go to System—>Administration —>Networking
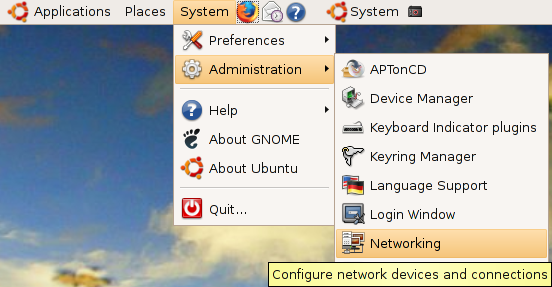


Once it opens you should see the following screen
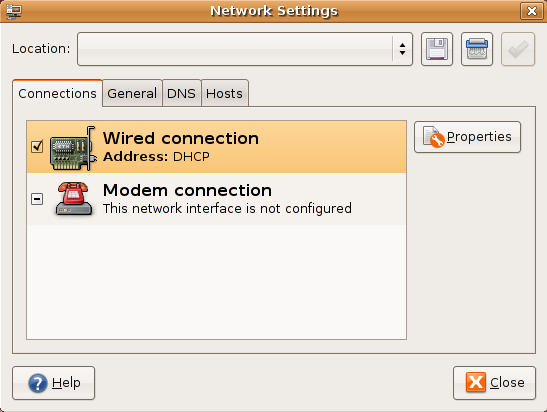


In the above screen select wired connection and click on properties tab you should see the following screen my network card is curretly configured for DHCP client and you need to make sure “Enable this connection” tick box is checked


If you want to configure the Static ipaddress you need to select drop down box under “Configuration” select static ip address and you need to make sure “Enable this connection” tick box is checked


Once you select the static ip address you need to select ip address,subnet mask,gateway address and click on ok


Now you click on “General” tab here you can enter your hostname,domain name


Next one you need to click on “DNS” tab to configure your system’s DNS settings, hostname, or DNS search path.


Click the Hosts tab, and then either click the Add or Properties button (after selecting a host) to create or edit an entry in your system’s /etc/hosts file


Highlight an existing entry, and then click the Properties button to change /etc/hosts entries in the Hosts tab of the Network Configuration screen.


You can also assign different locations to your computer, especially very useful if you are on a laptop and move between several networks each requiring different configurations. Just select the gray bar at the top of the network-admin window and select Create Location. Enter a name, such as Home and then repeat this again to create another location, Work. Each time you switch between locations, Ubuntu detects that it needs to use configurations specific to those locations, so for instance you might want to use DHCP at work, but not at home. Simple; just select the Home location, configure your ethernet connection to use a Static IP and you are all set to switch between your home and corporate networks.


Configure Network Interface Using Command-Line

You can configure a network interface from the command line using the networking utilities. You configure your network client hosts with the command line by using commands to change your current settings or by editing a number of system files.

Configuring DHCP address for your network card

If you want to configure DHCP address you need to edit the /etc/network/interfaces and you need to enter the following lines replace eth0 with your network interface card

sudo vi /etc/network/interfaces

# The primary network interface – use DHCP to find our address
auto eth0
iface eth0 inet dhcp

Configuring Static IP address for your network card

If you want to configure Static IP address you need to edit the /etc/network/interfaces and you need to enter the following lines replace eth0 with your network interface card

sudo vi /etc/network/interfaces

# The primary network interface
auto eth0
iface eth0 inet static
address 192.168.3.90
gateway 192.168.3.1
netmask 255.255.255.0
network 192.168.3.0
broadcast 192.168.3.255

After entering all the details you need to restart networking services using the following command

sudo /etc/init.d/networking restart

Setting up Second IP address or Virtual IP address in Ubuntu

If you are a server system administrator or normal user some time you need to assign a second ipaddress to your Ubuntu machine.For this you need to edit the /etc/network/interfaces file and you need to add the following syntax.Below one is the only example you need to chnage according to your ip address settings

sudo vi /etc/network/interfaces

auto eth0:1
iface eth0:1 inet static
address 192.168.1.60
netmask 255.255.255.0
network x.x.x.x
broadcast x.x.x.x
gateway x.x.x.x

You need to enter all the details like address,netmask,network,broadcast and gateways values after entering all the values save this file and you need to restart networking services in debian using the following command to take effect of our new ipaddress.

After entering all the details you need to restart networking services using the following command

sudo /etc/init.d/networking restart

Setting your ubuntu stytem hostname

Setting up your hostname upon a ubuntu installation is very straightforward. You can directly query, or set, the hostname with the hostname command.

As an user you can see your current hostname with

sudo /bin/hostname

Example

To set the hostname directly you can become root and run

sudo /bin/hostname newname

When your system boots it will automatically read the hostname from the file /etc/hostname

If you want to know more about how to setup host name check here

Setting up DNS

When it comes to DNS setup Ubuntu doesn’t differ from other distributions. You can add hostname and IP addresses to the file /etc/hosts for static lookups.

To cause your machine to consult with a particular server for name lookups you simply add their addresses to /etc/resolv.conf.

For example a machine which should perform lookups from the DNS server at IP address 192.168.3.2 would have a resolv.conf file looking like this

sudo vi /etc/resolv.conf

enter the following details

search test.com
nameserver 192.168.3.2

Network Troubleshooting Tips

Networking is sometimes considered to be complex, and hard to troubleshoot and manage. However, Linux provides you with Some tools to figure out exactly what’s going wrong on your network, and how to fix it.Here we are going see some tools and how to check the network connectivity.

Ping

Ping is a computer network tool used to test whether a particular host is reachable across an IP network. Ping works by sending ICMP “echo request” packets to the target host and listening for ICMP “echo response” replies (sometimes dubbed “Pong!” as an analog from the Ping Pong table tennis sport.) Using interval timing and response rate, ping estimates the round-trip time (generally in milliseconds although the unit is often omitted) and packet loss (if any) rate between hosts.

This is very basic and powerful tool to check Internet connection

Example

ping -c 4 google.com

-c option is used to pass how many packets you’re sending

If everything working file you should get reply looks like below

Pinging www.l.google.com [64.233.183.103] with 32 bytes of data:

Reply from 64.233.183.103: bytes=32 time=12ms TTL=244

Ping statistics for 64.233.183.103:
Packets: Sent = 4, Received = 4, Lost = 0 (0% loss),
Approximate round trip times in milli-seconds:
Minimum = 12ms, Maximum = 12ms, Average = 12ms

Traceroute

traceroute is a computer network tool used to determine the route taken by packets across an IP network. An IPv6 variant, traceroute6, is also widely available.Very useful to trace IP packets.

Example

traceroute google.com

ifconfig

The Unix command ifconfig can function as a tool to configure a network interface for TCP/IP from the command line interface (CLI).This is another easy tool to see if your interface is actually loading correctly.

Example

ifconfig

eth0 Link encap:Ethernet HWaddr 00:0A:E6:C6:07:85
inet addr:132.18.0.16 Bcast:132.18.0.255 Mask:255.255.255.0
inet6 addr: fe80::20a:e6ff:fec6:785/64 Scope:Link
UP BROADCAST RUNNING MULTICAST MTU:1500 Metric:1
RX packets:18458 errors:0 dropped:0 overruns:0 frame:0
TX packets:8982 errors:0 dropped:0 overruns:0 carrier:0
collisions:0 txqueuelen:1000
RX bytes:4015093 (3.8 MiB) TX bytes:1449812 (1.3 MiB)
Interrupt:10 Base address:0xd400

Route

This is very useful to check routing config

Example

route -n

Netstat

If you want to see Routing Tables,all open ports,all listen ports

netstat -nr

-n means return numeric output (ie, IP address instead of hostname)

-r means print the routing table

find all open ports

netstat -a

find listening ports

netstat -l


Source: Debian Admin

1
Building a Linux home media center

Like a lot of people nowadays, I have a growing collection of digital media. My digital media is stored on a home Linux server. Most of the digital media players available today do not support protocols to connect to a Linux server, which make them unsuitable for my use. I realized the best way to connect my digital media library with my home theatre was to build my own Linux home media center (LHMC).


My LHMC would have to interface with my existing home configuration via a wireless network with WPA security enabled and output to my television's S-Video or composite inputs, and it would have to connect to my media server via NFS.

For my LHMC hardware I choose the MSI MEGA 180. One of its main attractions was that it is based on a Linux-supported Nvidia chipset and video card. The video card in this model has S-Video and composite outputs. The box has frontal USB and a built-in 6-in-1 media card reader. The MEGA 180 comes as a barebones product. I purchased one in an online auction with an AMD Athlon 2400+ processor, 60GB hard drive, and DVD player for about $350.

I choose to install Ubuntu Linux on the LHMC because, thanks to its Debian roots, Ubuntu is easy to update and manage, and has a wide range of software available. The low maintenance overhead it provides makes the LHMC behave as reliably as an embedded system. And the Ubuntu community offers many solutions and guides in its wiki and forums.

The Ubuntu installation detected all of the MEGA's hardware correctly. The only thing that was configured incorrectly after the installation was the default screen resolution. To configure the video, Ubuntu needed to be configured to get sources from the universe and multiverse repositories. This allowed for the installation of the binary Nvidia drivers. X.org needed to be set up to output through S-Video so it could display to my television. This process is well documented on Ubuntu's wiki. The Nvidia driver is also able to output in multiple HD standards.

Configuration of the wireless card was not as simple. The wireless card that comes with the MEGA 180 is an Ralink RT2460. Ralink makes some of the most open source-friendly wireless chipsets in existence, yet the rt2400 driver doesn't support WPA. I worked around this by using the ndiswrapper driver, which can support WPA though wpa_supplicant. I configured ndiswrapper with the Windows version of the Ralink drivers. To prevent the rt2400 driver from loading at startup and conflicting with the ndiswrapper kernel module, I created a file named wlan under /etc/modutils and entered the line alias rt2400 ndiswrapper.

The configuration of WPA is well laid out in an Ubuntu howto. Because I was using ndiswrapper, the interface name of the card was wlan0. wpa_supplicant must be configured to use the ndiswrapper driver, so the /etc/default/wpasupplicant file needed to have OPTIONS set like this:
OPTIONS="-i wlan0 -D ndiswrapper -c /etc/wpa_supplicant.conf"

With hardware setup nearly complete, one thing still bugged me. The MEGA's LED display shows the hardware clock's time, but Ubuntu defaults the hardware clock to UTC, so the MEGA's clock was always off by the difference between my local timezone and UTC. By grepping though the etc directory for the string "UTC," I discovered that the configuration option was in the file /etc/default/rcS. Changing the line UTC=yes to UTC=no resolved the issue.

All of my digital media is stored on an NFS share. To enable NFS mounting in Ubuntu, I installed the portmap package. I added the line mediaserver.example.com:/home/media /home/media noatime,rsize=32768,wsize=32768,bg 0 0 to /etc/fstab so that the media library would be mounted to /home/media at system startup.

Now that the LHMC had access to the media library, it was time to install the packages to enable playback of media: Rhythmbox for audio and Totem for video.

To configure Totem to play video, I installed the totem-xine package. The default backend, GStreamer, is automatically removed when you install the totem-xine package.

Audio playback was next. My Ogg music files played out of the box. The key to getting MP3 playback to work was installing libmad. I installed both libmad0 and gstreamer0.8-mad, and was able to play MP3 files. To fill any gaps that might come up, I also installed the gstreamer0.8-plugins-multiverse package, which includes all of the GStreamer plugins.

The LHMC has been rock solid since I set it up. It has handled all of the tasks that I planned to use it for and then some. The wow factor that I get when people visit is nice too.

Source: Linux.com

6
Install dan Gunakan Visio di Ubuntu

Pertama-tama pastikan paket Wine sudah terinstall.
$ sudo apt-get install wine cabextract

Install IE4Lnux, IE4Linux dibutuhkan oleh beberapa bagian instalasi Visio dan runtimenya.

$ wget ttp://www.tatanka.com.br/ies4linux/downloads/ies4linux-2.0.tar.gz -O – | tar xvzf -

setelah terdownload, jalankan :
$ cd ies4linux/
$ ./ies4linux

Ikuti instruksinya, program ini akan mendownload paket2 yang diperlukan dari microsoft.com dan kemudian akan terinstall IE di ubuntu anda.

Menjalankan wine di ubuntu 8.04 mungkin menghasilkan error sbg berikut:
preloader: Warning: failed to reserve range 00000000-60000000
err:dosmem:setup_dos_mem Cannot use first megabyte for DOS address space,
please report

trik berikut akan menghilangkan error tersebut, tetapi akan mengurangi sisi sekuriti
$sudo vim /etc/sysctl.conf
ubah baris berikut:
vm.mmap_min_addr = 65536

menjadi:
vm.mmap_min_addr = 0
Perubahan ini akan berpengaruh setelah dilakukan reboot

Selanjutnya adalah menginstall Visio.
dari direktori dimana ada source visio jalankan :
$ wine SETUP.EXE
ikuti wizardnya sebagaimana instalasi di windows

Nah Viso sudah terinstall
Jika ada error seperti “IOPL not enabled” jalankan winecfg
di Libraries tab, tambahkan library
gdiplus.dll (native)

Visio ini bisa mebuat file dan menyimpan file baru, tapi sayangnya crash beberapa detik setelah saya coba membuka file visio lama yang agak kompleks.

Source: Daliman Blogs

0
Install Windows di dalam Ubuntu

Ubuntu saat ini udah cukup ok untuk digunakan, tapi beberapa hal mungkin masih memerlukan windows. Untuk hal tersebut mungkin kita bisa menggunakan wine, selain wine maka ada 1 cara lagi yaitu dengan menginstall window didalam ubuntu. Jadi Windows tersebut akan running didalam Ubuntu. Cara menginstall yang aku dapat :

* Download paket virtual box dari virtualbox.org dan pilih paket yg sesuai dengan OS.
* Install paket installernya dan kita akan diminta password administrator.
* Lalu akan di download bberpa paket file tambahan dari internet, setelah muncul jendela konfigurasi klik Forward terus sampai Instalation Finished dan Restart komputer
* Virtual Box sudah siap dijalankan dan kini siap menginstal Windows XP didalam Ubuntu 8.10
* JalankanVirtual Box melalui Applications dan System Tools
* Pada pernyataan lisensi, baca sampai bawah hingga tommbol I Agree aktif
* Pada jendela registrasi pilih cancel, karena kalo diisi maka harus secara online. Bila tidak diisi, jendela ini akan selalu muncul setiap kita menjalankan VirtualBox
* Virtualbox sudah aktif, masukkan cd intaller XP dan klik new
* akan muncul sebuah wizard, beri nama virtual mesin sesuai keinginan. Di OS type pilih WindowsXP
* Lalu tentukan RAM yg akan dikonsumsi (384MB), lalu buat HD virtual yg akan dipakai oleh Windows n klik New
* HD virtual memiliki 2 opsi, dynamic n fixed pada dynamic kapasitas yang diberikan pada windows sedikit tapi berkembang sesuai dengan kebutuhan windows.
* Tentukan kapasaitas dasar besarnya kapasitas dynamic (3GB) klik Next lalu Finish
* Konfigurasa selesai dan siap digunakan.
* Kembali ke jendela utama VirtualBox lihat apakah CD/DVD sudah di-mount lalu klik Start
* Instalasi windows akan berjalan seperti umumnya.
* Saat akan menggunakan Windows yang ada di VirtualBox akan muncul peringatan, centang Do not Show this message again dan klik Capture.
* Pointer mouse akan aktif hanya di jendela VirtualBox, untuk kwmbali ke Ubuntu tekan Ctrl sebelah kanan.
* Windows di Ubuntu ready.

2
Install Chrome di Ubuntu

Install Chrome di Ubuntu

Simple aja, pertama add GPG keynya

sudo apt-key adv --recv-keys --keyserver keyserver.ubuntu.com 0xfbef0d696de1c72ba5a835fe5a9bf3bb4e5e17b5

kemudaian sudo apt-get update

setelah update selesai install google chromenya

sudo apt-get install chromium-browser

untuk menjalankan aplikasnya

Applications --> Internet --> Chorium Web Browser

cara lain untuk install google chrome dengan mendownload file .deb

1. wget http://media.codeweavers.com/pub/crossover/chromium/cxchromium_0.9.0-1_i386.deb

2. sudo dpkg -i cxchromium_0.9.0-1_i386.deb

7
Dual boot Ubuntu and Windows 7 (Ubuntu installed first)

“How to” Dual boot Ubuntu and Windows 7 (Ubuntu installed first)

##This guide does not work for Karamic or future releases, For that see page 14 and follow the link provided by presence1960 for how to dual boot with Grub2 (requires some reading) I will update this guide for grub2 when I have more time##

I have recently seen many posts from people trying to dual boot Ubuntu and Windows 7 beta, but not succeeding. So I tried it out myself and found a solution.
Index

1. Obtain a copy of Windows7.
2. Partition your disk with gparted.
3. Install Windows7.
4. Re-install Grub.
5. Edit Grub to List Windows 7.
6. Have Fun.
__________________________________________________ ________________________________

1. Obtain a copy of windows 7.

*You can also find a torrent of this but for legal reasons I cannot provide a link. *


2. Partition your disk

**This does go wrong in some cases, if in doubt back up your valuable data.**

Boot from a Ubuntu live cd or a gparted live cd.
Start up gparted, If ubuntu is on the whole disk you need to re-size it by at least 8 gb for Windows 7. (Make sure windows 7 is on the second partition to make it easier for grub) You will be left with some unallocated space on your hard disk if you want you can partition it to NTFS or you can do it later on the windows install.

3. Install Windows 7

Follow the on screen instructions, Select the un-partitioned space to format and install windows on, or if you already made it NTFS choose your NTFS partition.

**It will ask for a product key but you have 30 days to do that. Note: Beta keys will work with the RC**


4. Re-install GRUB

Now you have windows 7 but it has completely eaten your boot loader so you need to re-install grub.
Boot from the ubuntu live cd and go to terminal.
Type in terminal:

"sudo grub"
"grub> find /boot/grub/stage1"

That should return your Ubuntu partition in the form of (hdX,Y), use that:

grub> root (hdX,Y)
grub> setup (hd0)
grub> quit

(you don’t need to type the grub> bit)

That has re-installed grub but you can no longer see windows7

5. Edit grub.
Go to terminal from normal ubuntu and type :

“sudo gedit /boot/grub/menu.lst”

A large text file will open and at the bottom leave a line and add this:

title windows 7 beta (Loader)
root (hd0,1)
savedefault
makeactive
chainloader +1

(Do not type this line but if that does not work on re-boot try “hdo,0 or hd0,2” and so on until it works.)

Now that is done you can re-boot into windows 7 and ubuntu happily

Link Berkaitan:
#Dual Boot Ubuntu and Windows - Community Ubuntu Documentation
Although this may seem obvious, it is important to backup your data files to an external backup medium before attempting a dual-boot install

#How_to_dual boot ubuntu

Tutorial by eks on the Ubuntu forums. See also Dualboot two ...
https://help.ubuntu.com/.../How_to_dual-boot_Ubuntu_and_XP_after
http://www.ubuntugeek.com/dual-booting-windows-dan-ubuntu-fiesty-indonesian.html
Dual Booting Windows dan Ubuntu Fiesty (indonesian)”. gal says: May 18, 2010 at 5:38 am. wah terima kasih tutorialnya, ijin ngopi mas

#Installing Ubuntu with Windows Dual-Boot | Ubuntu Screencasts

7 Dec 2006 ... Once I've installed Ubuntu, and have a functioning dual boot system, can I undo the installation and return to a single boot windows system? ...
screencasts.ubuntu.com/Installing_Ubuntu_with_Windows_Dual-Boot

#Cara praktis instalasi dualboot ubuntu dengan windows. | Solve With IT
7 Sep 2009 ... Banyak pemula seperti saya terkadang bingung dan takut untuk memulai instalasi Operating system yang belum pernah di pakai.
solvewithit.com/.../instalasi-dualboot-ubuntu-dengan-windows-untuk-pemula

2
Membuat Paket Debian dari Precompiled Binary

Terkadang kita memiliki sebuah aplikasi yang ingin kita jadikan sebuah paket debian tetapi aplikasi yang akan kita gunakan ternyata sudah precompiled sehingga proses pembuatan paket deb secara normal tidak dapat dilakukan.. misal sebuah aplikasi java berupa file JAR.. atau sebuah library PHP4 yang telah dicompile untuk apache2.2.15 dengan mode handler(apxs2), tanpa harus mengcompile ulang, apalagi sibuk menutupi dependensi yang kadang bikin mumet kepala hanya untuk proses kompilasi saja.

contoh kita sudah melakukan make install php4 di folder /usr/local/php4
buatlah folder root untuk struktur penempatan file2 yang akan dimasukkan kedalam paket.

user@server:~$ sudo su
root@server:/home/user$ cd ~
root@server:~$ mkdir -p php4

buat struktur dan salin semua data aplikasi sama persis dengan penempatan aplikasi yang sudah terinstall pastikan tidak ada yang terlewat. pada kasus PHP4 disini semua data dan library hanya ada di dalam sebuah folder. pastikan juga pada saat menyalin permission masih sama dengan aslinya.

root@server:~$ cd php4
root@server:~/php4$ mkdir -p usr/local/php4
root@server:~/php4$ cp -rvp /usr/local/php4/* usr/local/php4

sekarang kita akan membuat file control untuk deskripsi paket debian yang akan kita buat

root@server:~/php4$ mkdir DEBIAN
root@server:~/php4$ vim DEBIAN/control

Package: php4-custom --> (nama paket yang akan dipanggil)
Version: 4.4.9
Section: base
Priority: required
Architecture: i386 --> (bila multi arch tambahkan dengan koma(,) )
Essential: yes
Pre-Depends: xxxx --> (masukkan semua paket dependensi kalau ada)
Origin: php4
Maintainer: muhammad zahris
Description: php4 untuk apache 2.2.15 --> (max 60 karakter)
bla bla bla --> (keterangan juga bebas jumlah karakternya)

sekarang kita buat debian paketnya

root@server:~/php4$ cd ..
root@server:~$ dpkg-deb -b php4 php4-custom.deb

S…E…L…E…S…A…I…

pada post mendatang mungkin akan dijelaskan cara membuat postins pada paket debian agar tidak perlu lagi dilakukan konfigurasi manual sama sekali setelah paket debian diinstall ke sistem.

3
iOS 4.0 dan Ubuntu 10.04

Pada ulasan Ubuntu 10.04 lalu, saya menulis tentang “dukungan pengenalan perangkat lebih baik“, terutama pada pengenalan perangkat iPhone/iPod Touch. Nah, rupanya sejak melakukan upgrade ke iOS 4.0, iPhone saya tidak lagi dikenali sebagai media penyimpan/pemutar audio, sehingga saya tidak bisa mengatur koleksi lagu pada iPhone saya melalui Rhythmbox. Bagaimana solusinya?

Berikut langkah-langkahnya:

1. Buka terminal, jalankan perintah berikut:

sudo add-apt-repository ppa:pmcenery/ppa

2. Setelah itu, jalankan perintah berikut untuk memuat ulang daftar paket:

sudo apt-get update

3. Jalankan perintah berikut untuk menginstalasikan beberapa paket:

sudo apt-get install libimobiledevice1

4. Jalankan perintah berikut untuk meng-update beberapa paket lama:

sudo apt-get dist-upgrade

5. Selesai!

Kini anda bisa mencolokkan kabel data USB dari iPhone/iPod Touch anda, dan anda akan mendapati jendela konfirmasi.

Ubuntu mengenali perangkat iOS 4.0!

Tunggu apa lagi? Segera klik OK untuk membuka Rhythmbox dan selamat mengatur (sinkronisasi) koleksi musik anda!

iPhone saya dikenali dengan baik pada Rhythmbox

Selamat mencoba!

0
Chrome Lock, Kunci Google Chrome Anda

Ini cuma sekedar iseng saja. Awalnya kehebohan sempat terjadi di booth Ubuntu pada acara Jagongan Media Rakyat 2010. Ternyata web browser Google Chrome bisa dikunci. Mari kita mencoba untuk mengunci Google Chrome :
1. Install ekstensi Chrome Lock, https://chrome.google.com/extensions/detail/ofilhkhdoiamdkbgciniekmdgjehaadm/

2. Konfigurasi ekstensi dengan memasukkan password


3. Restart Google Chrome
Anda tinggal aktifkan dengan menekan CTRL+SHIFT+L. Kalau muncul gembok dibawah kiri bawah berarti Google Chrome anda telah terkunci. Namun masih bisa kok untuk "dimainkan".


3
Berbagi data dari Ubuntu ke virtual box

Kebutuhan berbagi data memang sangat membantu jika pada saat Anda akan membutuhkan data tersebut untuk digunakan di mesin lain. Pada kasus kali ini, saya akan berbagi data dari mesin Ubuntu ke mesin Virtual Box. Sebelumnya Anda harus menginstall Samba terlebih dahulu

~$ sudo apt-get install samba


Setelah itu silahkan klik kanan folder yang akan dishare dan pilih Sharing Options, sebagai contoh saya telah mempunyai file yang akan saya share ke mesin Virtual.

Agar dimesin Virtual dapat mengakses folder yang telah dishare, maka terlebih dahulu buatlah user & password untuk Sambanya agar nantinya pada saat akan mengakses folder yang dishare akan meminta Username & Password

~$ sudo useradd namasaya

~$ sudo passwd namasaya

~$ sudo smbpasswd -a namasaya


Setelah mengatur Samba agar bisa berbagi data, jangan lupa untuk mengatur juga pada Virtual Box Settings >> Shared Folders >> klik Add Shared Folder

Selanjutnya silahkan masuk ke mesin Virtual Box yang dimana pada contoh kali ini OS yang digunakan adalah Windows XP dan cek pada bagian My Network Places apakah folder yang kita buat tadi sudah ada atau belum.

Masukkan Username & Password yang telah dibuat sebelumnya pada Samba, jika berhasil maka kita dapat mengakses file yang telah dishare.

Semoga bermanfaat.. :)


8
Setting Modem Venus VT12 di Ubuntu

Salah satu pengalaman yang menarik adalah ketika membuat Dial-Up Modem CDMA menggunakan Modem VT12 dengan Kartu Flexi Unlimited.

Pada dasarnya settingan Modem CDMA di semua distro Linux sama, juga pada Ubuntu. Kelebihan yang paling terasa saat menyetting modem CDMA di Ubuntu adalah kita tidak memerlukan driver khusus, beda dengan di "Jendela" yang mengharuskan kita menginstall Driver bawaan Venus VT12.

Cara setting Dial Up Modem venus VT12 di Ubuntu sangatlah mudah, sekalipun bagi newbie.
langkahnya adalah :

1. Colokkan Modem ke Kompi dan pastikan Modem udah kedetek ama Ubuntu,

Untuk mengecek apakah Modem udah kedetek apa belum tinggal masuk di Terminal-nya Ubuntu kemudian ketik "dmesg". Klo dah ada tulisan "ttyUSB0" atau "ttyUSB1" atau "ttyUSB2", dst disalah satu baris dari hasil perintah "dmesg" tadi berarti modem dah sukses dikenali oleh Ubuntu. Ini berlaku bukan hanya untuk modem Venus, tetapi untuk modem-modem lainnya.


2. Salah satu alat untuk membuat Dial Up adalah "wvdial". Untuk menginstal Wvdial silahkan download disini. Kemudian hasil downloadan tadi di ekstrak kedalam sebuah folder, misalkan diekstrak di /home/Venus12


3.ketikkan perintah di terminal

caprone@ubuntu-dekstop:~$cd /home/Venus12

sudo dpkg -i *.deb


4.edit Konfigurasi Wvdial dengan mengetikkan perintah di terminal

gksudo gedit /etc/wvdial.conf

ganti perintah-perintah di dalam wvdial.conf dengan perintah di bawah ini


[Dialer Flexi]
Init1 = ATZ
Init2 = ATQ0 V1 E1 S0=0 &C1 &D2 +FCLASS=0
Modem Type = Analog Modem
Baud = 230400
New PPPD = yes
Modem = /dev/ttyUSB0
ISDN = 0
Phone = #777
Password = telkom
Username = xxxxxxxxx@free
FlowControl = CRTSCTS
Stupid Mode = 1
Compuserve = 0
Idle Seconds = 300


Simpan dan keluar

5.Untuk men-dial modem ketikkan perintah "sudo wvdial" (tanpa tanda kutip)
kalo dah ada tulisan

Primary IP Address : xxx.xxx.xxx.xxx
Secondary IP Address : xxx.xxx.xxx.xxx

di bagian akhir tulisan yang muncul, maka sambungan dah sukses. Lanjutkan dengan browsing.....

6.Untuk memutus sambungan tinggal tekan tombol "Ctrl+c"
Itulah beberapa langkah setting Wvdial menggunakan Modem VT12 di Ubuntu.

Semoga membantu......


setelah mendapatkan no IP
barulah anda bisa internetan. jika sudah tidak digunakan, anda bisa menghentikan software dengan Ctrl+c

Download WVDIAL disini


6
Setting Camera HP jadi Webcam Di Ubuntu

Dokumentasi berikut ini adalah bagaimana cara menjadikan kamera hp menjadi webcam sehingga kita bisa memanfaatkan fitur yang tergolong jarang untuk di manfaatkan. untuk dokumentasi ini menggunakan device MT6225 yang biasanya tertanam di produk hp china ex. beyond, nexian dll
kebetulan hp yang di gunakan adalah beyond. berikut adalah langkah-langkahnya :

~sambungkan hp ke kompi menggunakan kabel usbnya, lalu pada hp akan muncul beberapa menu dan pilih webcam.
~cek apakah device terdetek
$ sudo dmesg | grep usb

berikut potongan yang aq dapatkan :

..
[ 257.124039] usb 2-2: new full speed USB device using uhci_hcd and address 2
[ 257.341679] usb 2-2: configuration #1 chosen from 1 choice
[ 257.372519] input: MT6225 as /devices/pci0000:00/0000:00:1d.0/usb2/2-2/2-2:1.0/input/input10
[ 696.552127] usb 2-2: USB disconnect, address 2
[ 726.192072] usb 2-2: new full speed USB device using uhci_hcd and address 3
[ 726.465646] usb 2-2: configuration #1 chosen from 1 choice
[ 726.496515] input: MT6225 as /devices/pci0000:00/0000:00:1d.0/usb2/2-2/2-2:1.0/input/input11
[ 1664.000121] usb 2-2: USB disconnect, address 3

jika anda mendapati keterangan semacam itu berarti dapat dipastikan device hp anda telah terdetek

~install driver webcam uvc
$ sudo apt-get install luvcview
$ sudo apt-get install uvccapture

jika sudah sekarang buka aplikasi cheese anda.
$ sudo cheese
jika belum terinstall lakukan penginstallan.
$ sudo apt-get install cheese

sekarang anda bisa mempunya webcam yang bisa dibawa kemana-mana

2
Ubuntu 2010 Review

.
Ubuntu 2010 Unleashed:

Irritated with my Desktop after an upgrade gone bad and an incident with the nvidia noveau driver that left me x less, I decided it was time to re-install. I turned to my bookshelf to find Ubuntu Unleashed 2010 Edition. Normally by the time a book hits my shelf the material is outdated, not necessarily useless, just not the most up to date. This is an exception. The Ubuntu Unleashed 2010 Edition was updated with an Ubuntu 9.10 DVD and a “Free Upgrade to Ubuntu 10.04? which I found out that if you buy the book before the end of 2010 you can get an upgrade kit in the mail.

So, I pop the DVD in the drive and start the installation. Nothing new here for anyone that has installed Linux or Ubuntu recently; for those that haven’t, it was a pleasant surprise to see that it actually detected my high resolution monitor and used it to its advantage. It really is strange to not have to squint at an installer. The first chapter covers the step by step installation in more detail which is relatively short and easy to follow. Most people should not need to read this if they are familiar with installing an operating system but it I think it is good to have it there. Just don’t let this first chapter prevent you from looking further into this book. After putting the DVD in and getting it started, I found myself reading the book through the entire installation; which for some reason got from 0-90% quickly, then took the majority of the time in the 90% range, but I’m not complaining.

The Authors really did a good job of writing in an understandable language and organizing the book in a logical format. I’ve found myself flipping through and finding many golden nuggets of information. I personally would not have picked this book up because of the title, since I’m not a big Ubuntu user. But Ubuntu Unleashed 2010 edition is packed full of information, 32 chapters and a hefty appendix to be exact. It is not all Ubuntu – specific either, meaning most of the content should work on just about distribution. This book would not be rendered useless if you don’t decide to go the Ubuntu route. I recommend taking a look at the contents and buying this book, as I’m sure you’ll be pleasantly surprised at the topics it covers. I think it would be a great book for someone that is interested in Linux in general, it reads well but can also be used as a quick reference. I wish I had a book like this when I was getting started, it would have saved me a whole lot of time and effort. I have set aside some of the more advanced chapters and made a note to read later.

Other reviews I’ve read have said that it has too much terminal use in it, which is something Ubuntu is trying to eliminate. While this may be true, if you want the most out of your Linux distribution, the fact is you will at some point use a terminal. Commands are less likely to change as much as graphical interfaces. Although some things may be slightly outdated I don’t think that this book should be re-written, as it is in the nature of open source and technology to change. If you keep this in mind I don’t think you’ll be disappointed with it.

Source: Go-Hacking


Bookmark and Share


Ujie Caprone | © 2011 Blogger Template by Ujiecaprone.com